Foretify configuration
There are two categories of configuration options:
- The YAML configuration options mainly affect Foretify and flow management, such as which port to use for the GUI, which test to load, and so on.
- The OSC2 configuration options mainly affect test configuration, such as the maximum simulation time allowed or other configurations that depend on the loaded files.
YAML configuration options
To see a list of these settings, invoke foretify with the --help_config options.
The configuration file is a hierarchical file, where multiple parameters are specified for various Foretify features, such as the compiler, the test generator, batch mode and so on. Parameters specified for a specific feature apply only to that feature.
The configuration file uses YAML syntax. For more information on YAML, see YAML.org.
On startup, Foretify checks for a configuration file in the path ~/.foretify.cfg. If the file exists, it is loaded. If you prefer, you can specify the file explicitly with the --config invocation option.
Foretify supports the use of environment variables in the YAML configuration file. Given the following setting for work_dir, for example, the work_dir is set to the current value of $COMMON_WORK_DIR.
work_dir: ${COMMON_WORK_DIR}
Note
Curly braces, not parentheses, are required.
Description of YAML options
General options
These options are listed in the YAML file without indentation. For example
load: $FTX_PACKAGES/base_scenarios/scenarios/vehicle_cut_in/vehicle_cut_in_and_slow/vehicle_cut_in_and_slow_top.osc
load: $FTX/env/basic/exe_platforms/sumo_ssp/config/sumo_config.osc
| Option | Description |
|---|---|
| load | The pathname of an OSC file to load into foretify. (Multiple load options are allowed.) |
| load_run | The pathname of a directory containing a previously executed run. (The run will be re-executed.) |
| debug_replay | The pathname of a directory containing a previously executed run. (The run will be re-played.) |
| work_dir | The Foretify work directory. the default is ~/foretify. |
| inactivity_hours | Defines the number of hours after which Foretify will automatically close if no activity is detected. The default is 24. |
| demo | Run Foretify in demo mode. The default is false. |
| match | Path to an OSC file including the match scenario to run. |
Batch options
These options are listed in the YAML file indented under batch:.
batch:
    initial_seed: 26
| Option | Description |
|---|---|
| run_test_on_init | Run loaded/generated test file. The default is false. |
| batch_mode | Quit after running batch commands. The default is false. |
| initial_seed | Foretify initial test seed. The default is 1. |
| pre_commands | Batch commands to execute before the run starts. |
| commands | Batch commands to execute after the run completes. |
| job_id | ID for Foretify test run, will be written to run_info.json file. |
| consecutive_runs | Run consecutive tests of the same OSC file, the initial seed incremented by 1 for each run. The default initial seed is 0. |
| consecutive_seeds | Run consecutive tests of the same OSC file using the provided comma-separated list of seeds (for example: "1,3,5"). |
Server options
These options are listed in the YAML file indented under server:.
server:
    gui: true
| Option | Description |
|---|---|
| gui | Enable Foretify UI via web browser. The default is false. |
| server | Enable Foretify client-server environment. The default is false. |
| port | Set explicit web server listening port. The default is 0. |
Status server options
These options are listed in the YAML file indented under server:.
status_server:
    enable-status-server: true
| Option | Description |
|---|---|
| enable-status-server | Run server status. The default is false. |
| status-server-port | The port to listen to. The port is chosen automatically. |
Runtime options
These options are listed in the YAML file indented under runtime:.
runtime:
    step: ON
| Option | Description |
|---|---|
| step | Run simulation in step mode. The default is OFF. |
| run_timeout | Allowed time, in seconds, per a single test run. 0 means no timeout (the default). |
| keepalive_timeout | Allowed time, in seconds, for Foretify runtime engine to respond. 0 means no timeout. The default is 60 seconds. |
| trace_issues | Issues tracing. The default is OFF. |
| debug_record | Enable recording of simulation data. The default is false. |
| verbosity | Logger verbosity level. Values are ERROR, INFO (the default), DEBUG, TRACE. |
| set | Set OSC configuration fields. |
Physical type display precision option
This option is listed in the YAML file indented under runtime:
runtime:
  physical_type_display_precision: 4
| Option | Description |
|---|---|
| physical_type_display_precision | Define the number of digits to display after the decimal point for physical types. Valid values are 0 to 17. The default is 2. |
Display unit options
By default, every physical type is displayed using its SI unit (for example, length by meter and speed by mps), with the exception of temperature which is displayed in Celsius. Use the display_units option to override the default display unit for any physical type.
These options are listed in the YAML file indented under runtime: and under display_units:
runtime:
  display_units:
    temperature: fahrenheit
    speed: kph
See also display_units and unit type declarations.
Test generator options
These options together with the load options generate a test file. These options are listed in the YAML file indented under test_generator:.
load: $FTX_PACKAGES/base_scenarios/scenarios/vehicle_cut_in/vehicle_cut_in_and_slow/vehicle_cut_in_and_slow_top.osc
load: $FTX/env/basic/exe_platforms/sumo_ssp/config/sumo_config.osc
test_generator:
    main_scenario: cut_in_and_slow
    map: $FTX_PACKAGES/maps/M78_FTX_suburban_hooder.xodr
    output_file: test1
| Option | Description |
|---|---|
| main_scenario | The name of the test's top main scenario. |
| map | The pathname of the map file for the test. |
| output_file | The name of the test file to generate. |
Flow parameter processing
If multiple flow parameters, such as run or load are specified, their processing order is not defined by the order of the parameters as invocation options or in the configuration file. Instead, there is a predefined precedence for the different parameters types:
- load
- pre_commands
- crun (consecutive runs) / run (in case crun was not set)
- commands
- quit (batch_mode)
Note
If batch mode is specified and one of the steps such as compilation fails, Foretify exits immediately with non-zero exit code.
Example flow configuration file
The following configuration file does the following:
- Loads two files.
- Writes a file called test1.osc (shown below the configuration file).
- Loads the test1.osc file.
- Launches the run.
- Completes the run.
- Executes the show scenarios command.
- Exits the session.
load: $FTX_PACKAGES/base_scenarios/scenarios/vehicle_cut_in/vehicle_cut_in_and_slow/vehicle_cut_in_and_slow_top.osc
load: $FTX/env/basic/exe_platforms/sumo_ssp/config/sumo_config.osc
test_generator:
    main_scenario: cut_in_and_slow
    map: $FTX_PACKAGES/maps/M78_FTX_suburban_hooder.xodr
    output_file: test1
batch:
    run_test_on_init: true
    batch_mode: true
    commands: "show scenarios"
# This test file was auto-generated by Foretify
# according to the configuration specified above.

import "$FTX_PACKAGES/base_scenarios/scenarios/vehicle_cut_in/vehicle_cut_in_and_slow/vehicle_cut_in_and_slow_top.osc"
import "$FTX/env/basic/exe_platforms/sumo_ssp/config/sumo_config.osc"

extend top.main:
    do sut.cut_in_and_slow()
OSC2 configuration options
The top actor contains the configuration struct instance top.config. This struct in turn contains four more struct instances: ego_config, map_config, sim_config, test_config; that let you configure various aspects of the environment.
Notes
- top.config and the struct instances it contains exist before, during, and after generation. The fields in these struct instances are non-generatable.
- When you load a new file, Foretify retains the current top.config settings unless they are overridden by top.config settings in the new file. This means you don't need to re-apply current settings when loading a new test file.
For a detailed description of the OSC2 configuration options, see Description of OSC2 configuration options.
How to set the OSC2 configuration options
You can set the OSC2 options in the following ways:
-
Assign values to the OSC2 configuration fields in an OSC2 file.
OSC2 code: set sim and test options# test.osc extend sim_config: set step_time = 10ms extend test_config: set map = "$FTX_PACKAGES/maps/M78_FTX_suburban_hooder.xodr" -
Include the setting in a YAML configuration file. For example:
YAML code: set sim and test optionsruntime: set: - "config.sim.step_time=10ms" - "config.test.map=$FTX_PACKAGES/maps/M78_FTX_suburban_hooder.xodr"Note
The dash and a space (- ) is required when listing items in a sequence.
-
Use the --set invocation option to foretify. For example:
Shell command: set sim and test options$ foretify --load mytop.osc --set config.sim.step_time=10ms --set config.test.map="$FTX_PACKAGES/maps/M78_FTX_suburban_hooder.xodr" -
Issue the set command at the Foretify prompt. For example:
Foretify command: set sim and test optionsForetify> set config.sim.step_time=10ms Foretify> set config.test.map="$FTX_PACKAGES/maps/M78_FTX_suburban_hooder.xodr"
Note
In case of conflict, the order of precedence from lowest to highest is as follows:
- Assigning the fields in top.config in an OSC2 file.
- Specifying options in a YAML configuration file.
- Specifying options when invoking Foretify.
- Specifying options with commands at the Foretify prompt.
Example 1
If config2.osc is loaded, the map and speed_factor settings remain the same; only the step_time setting is changed.
# config1.osc

extend sim_config:
    set step_time = 10ms
    set speed_factor = 1
extend test_config:
    set map = "$FTX_PACKAGES/maps/M78_FTX_suburban_hooder.xodr"
# config2.osc

extend sim_config:
    set step_time = 50ms
Example 2
There is an additional way to set the config.test.map option: the --map invocation option.
foretify --load test1.osc --map M78_FTX_suburban_hooder.xodr --run
Foretify> load test2.osc
Foretify> run
Foretify> set config.test.map="M73_FTX_highway.xodr"
Set map requires runtime environment restart
[INFO] Compilation done, 0 errors and 0 warnings reported


Initializing Foretify runtime...

Foretify> run
Starting new run...
Advanced configuration options
This section describes configuration options that might be useful in some cases, but not in general.
Naming Regions of Interest (ROI) on a large map
When using a map with hundreds of roads, you can lower the generation time of scenarios by identifying Regions of Interest (ROI):
- Create a JSON file that defines the ROIs for a map.
- Use map configuration options to specify the path to the JSON file and the ID of the ROI configuration that you want to use.
- View the ROI configuration ID in Foretify Manager.
JSON file format
The format of a JSON file that defines ROIs is as follows:
{
   "rectangles": [ <rectangle1>,....],
   "configurations": [<config1>,...]
}
The format of a single rectangle is as follows:
{ "<rectangle_id>": [<x1>,<y1>,<x2>,<y2>}
-
rectangle_id is the unique id of the rectangle (string)
-
x1, y1, x2, y2 are the global coordinates of the corners of a rectangle. The rectangle is created based on (min(x1,x2), min(y1,y2), max(x2, x2), and max(y1,y2). See Foretify's coordinate system for details about coordinates.
The format of a single configuration is as follows:
{"id": "<id>", "positive": [rec1,...], "negative": [rec2, ...]}
-
id is a unique configuration id (string). This value is used in config.map.usable_map_area_configuration_id to choose the ROI.
-
positive lists all rectangle ids that should be included in the ROI.
-
negative (optional) lists rectangle ids that should be excluded. You can use this to create more complex ROIs by including a bigger rectangle and then excluding parts of it.
Additional ROI Applications
In addition to using a user-provided JSON ROI, Foretify can automatically determine the ROI in the following cases: - Evaluate scenarios: The ROI is inferred from the ingested object list. - Smart-Replay scenarios: The ROI is inferred from the replayed scene. - Foretify reloaded run: The original ROI from the run is applied.
When an ROI is provided to the Foretify runtime, two user messages are logged: one indicating the source of the ROI (such as ingested object list, Smart Replay, reloaded run, or JSON file), and another detailing the actual configuration, listing the "positive" and "negative" rectangles.
Example
-
Create a JSON file that defines the ROIs for a map.
The following JSON file defines five ROIs.
JSON code: define five ROIs{ "rectangles": [ { "highway1": [549358, 4121208, 554807, 4115238]}, { "highway2": [549853, 4121181, 553192, 4119409]}, { "town1": [550682, 4119615, 553440, 4118514]}, { "town2": [551872, 4118534, 553599, 4117366]}, { "town3": [553247, 4117021, 554542, 4115508]} ], "configurations": [ {"id": "1", "positive":["town1"]}, {"id": "2", "positive":["town2"]}, {"id": "3", "positive":["town3"]}, {"id": "4", "positive":["highway1", "highway2"], "negative":["town1", "town2", "town3"]} ] } -
Use map configuration options to specify the path to the JSON file and ID of the ROI configuration that you want to use.
The following OSC2 code defines the ROIs for the scenario.
OSC2 code: configure the ROIs for a scenarioextend test_config: set map = "$MAPS/town_highway.bin" extend map_config: set usable_map_area_json_file = "$MAPS/town_highway_rois.json" set usable_map_area_configuration_id = "3" -
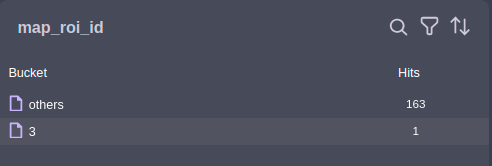
View the ID of the ROI configuration in Foretify Manager.
a. Click on top.info.run to display the map metrics.
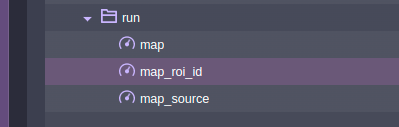
b. Click on map_roi_id to display the ROI configuration ID.