60. Work with triage attributes
A triage attribute is a label you attach to a run to capture information about it. Attributes are the building blocks of an effective triage workflow — you use them to classify runs, filter views, and define rules that apply automatically to future results.
Typical uses include:
- Override a failed verdict — mark a run as Passed once your team has reviewed and accepted it.
- Dismiss known non-issues — set the status to Non Issue and hide those runs from your view.
- Track bugs — link runs to issue IDs in an external bug tracker.
- Refine your data — tag runs with custom labels to group and filter results more precisely.
To see a complete list of the predefined triage attributes, see Run attributes.
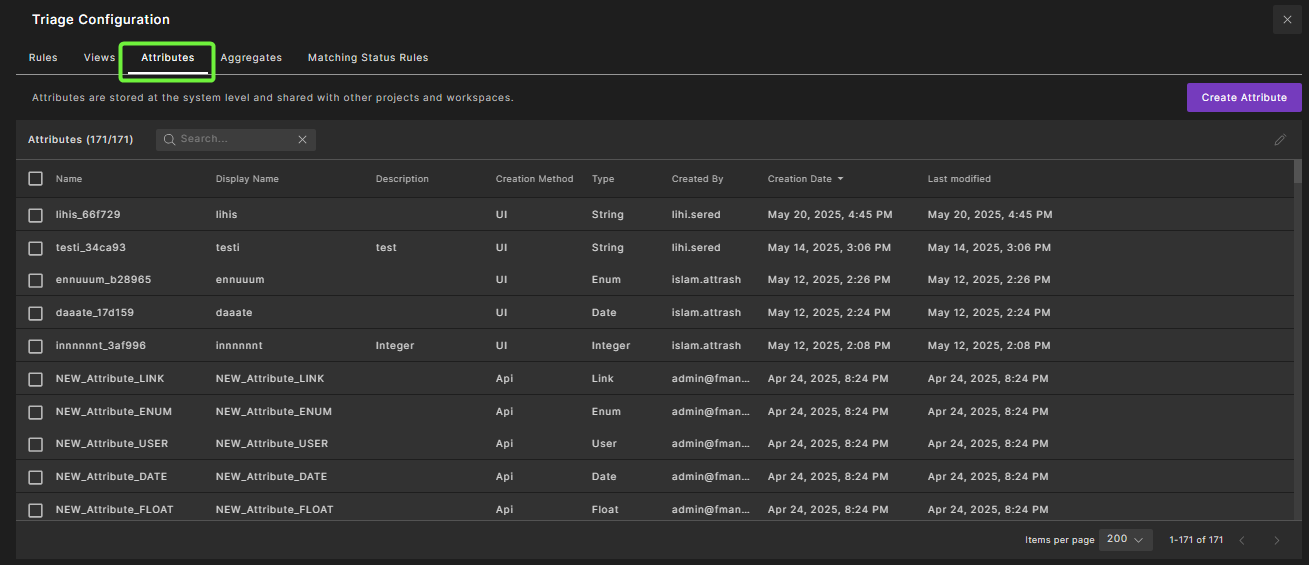
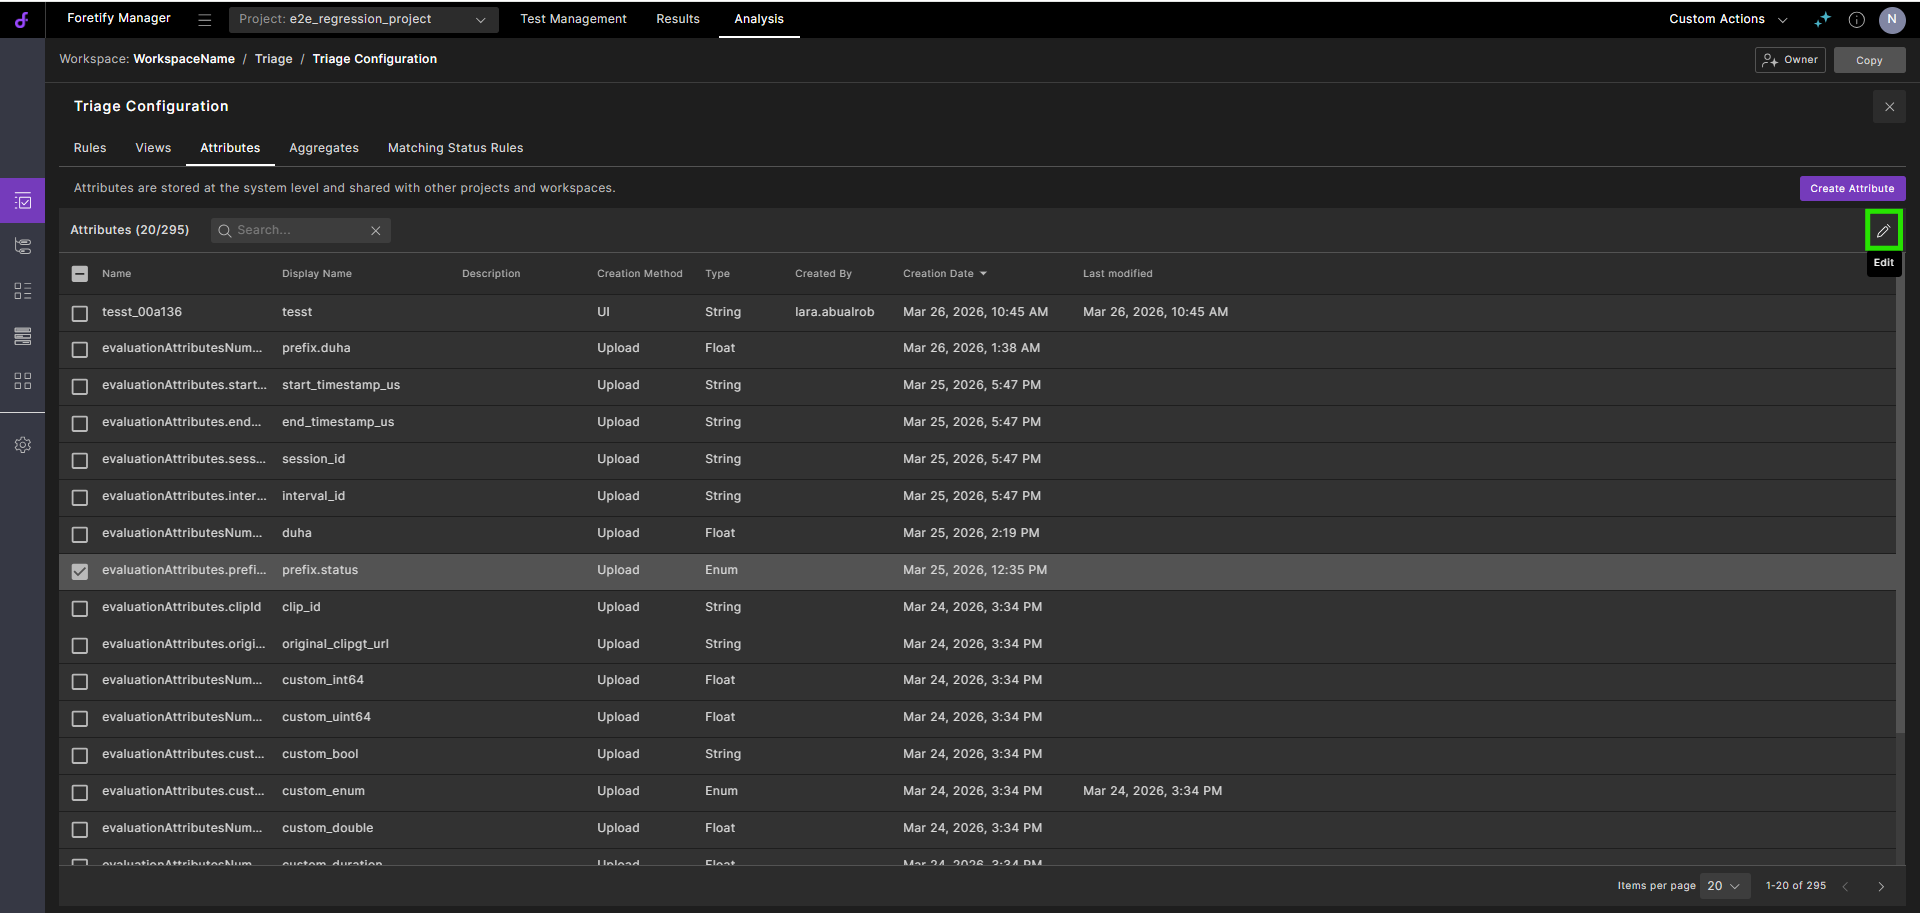
60.1 Manage triage attributes
To manage triage attributes:
-
Click Triage Configuration on the bottom left of the Triage view.

The Triage Configuration page displays.
-
Select the Attributes tab.
-
On the Attributes tab, you can do the following:
-
To create a new attribute, click Create Attribute on the top right. See Create a triage attribute for steps.
-
To edit an attribute, select the attribute and click the Edit Attribute icon on the top right. You can edit the name and the comment for the attribute. Click Save.
-
60.2 Attributes table
The Attributes table shows all available attributes in the system. The attribute columns are as follows:
| Column | Description |
|---|---|
| Name | The attribute's internal database name. |
| Display name | The name used when accessing the attribute from the user interface (in the Tree pane, Runs table, and when defining rules). |
| Comment | (Optional) User-defined comment. |
| Creation method | Defines how the attribute was created.
|
| Type | Attribute type. |
| Created by | The user who created the attribute. |
| Creation date | Date the attribute was created. |
60.2.1 Attribute types
Foretify Manager supports the following attribute types:
| Attribute Type | Description |
|---|---|
| String | The attribute accepts any string value. |
| Integer | The attribute values are restricted to integer values. |
| Float | The attribute values are restricted to floating point values. |
| Enum | The attribute values are restricted to those specified when the Enum attribute was created. The enumeration values are available in filters, rule conditions and assignments where the attribute is used. |
| Link | The attribute values depend on the URL link template specified when the Link attribute was created. When creating a Link attribute, you specify a URL link template that will be used to render links for attribute values. For example, say you have a bug tracking web system that lets users navigate to issues by their ID. Assume the link template is: https://bug-tracker/issue/{}. When setting a value to the attribute, the user only needs to enter the issue ID (for example, “BUG-2471”). Once you have created a Link attribute:
|
| Date | The values are restricted to date or time values only. |
| User | Triage presents all available users of the project for the user to select from. |
60.3 Create a triage attribute
When you create a triage attribute, the attribute’s name is displayed in the column chooser, run tables, filters, rule conditions and assignments where the attribute is used.
To create a triage attribute:
-
Create an attribute using one of the following methods:
-
Click Triage Configuration on the bottom left of the main Triage view, then select the Attributes tab and click Create Attribute on the top right.
-
Click Create Attribute on the top right of the main Triage view.
-
-
Enter the attribute Name.
-
Optionally, click + Internal name to enter an internal name for the attribute.
-
Optionally, enter a Description for the attribute.
-
Select the Type for the attribute. See Attribute types for a discussion of the supported data types.
-
If you select Enum, enter the first enumeration value as Value 1, then click + Add value for each additional enumeration value.
-
If you select Link, define the URL link template as described in the Attribute types section.
-
-
Click Create.
Note
- For early versions of Triage, the attribute name must be unique within the system. In upcoming phases of development, there will also be workspace- and project-level attributes.
- To display the new attribute as a column in the Runs table, see Select columns to display in a table.
60.4 Edit a triage attribute
To edit a triage attribute:
-
In the Triage Attributes table, select the attribute and click the Edit icon
 .
.
-
In the Edit attribute dialog, edit the name and the comment for the attribute.
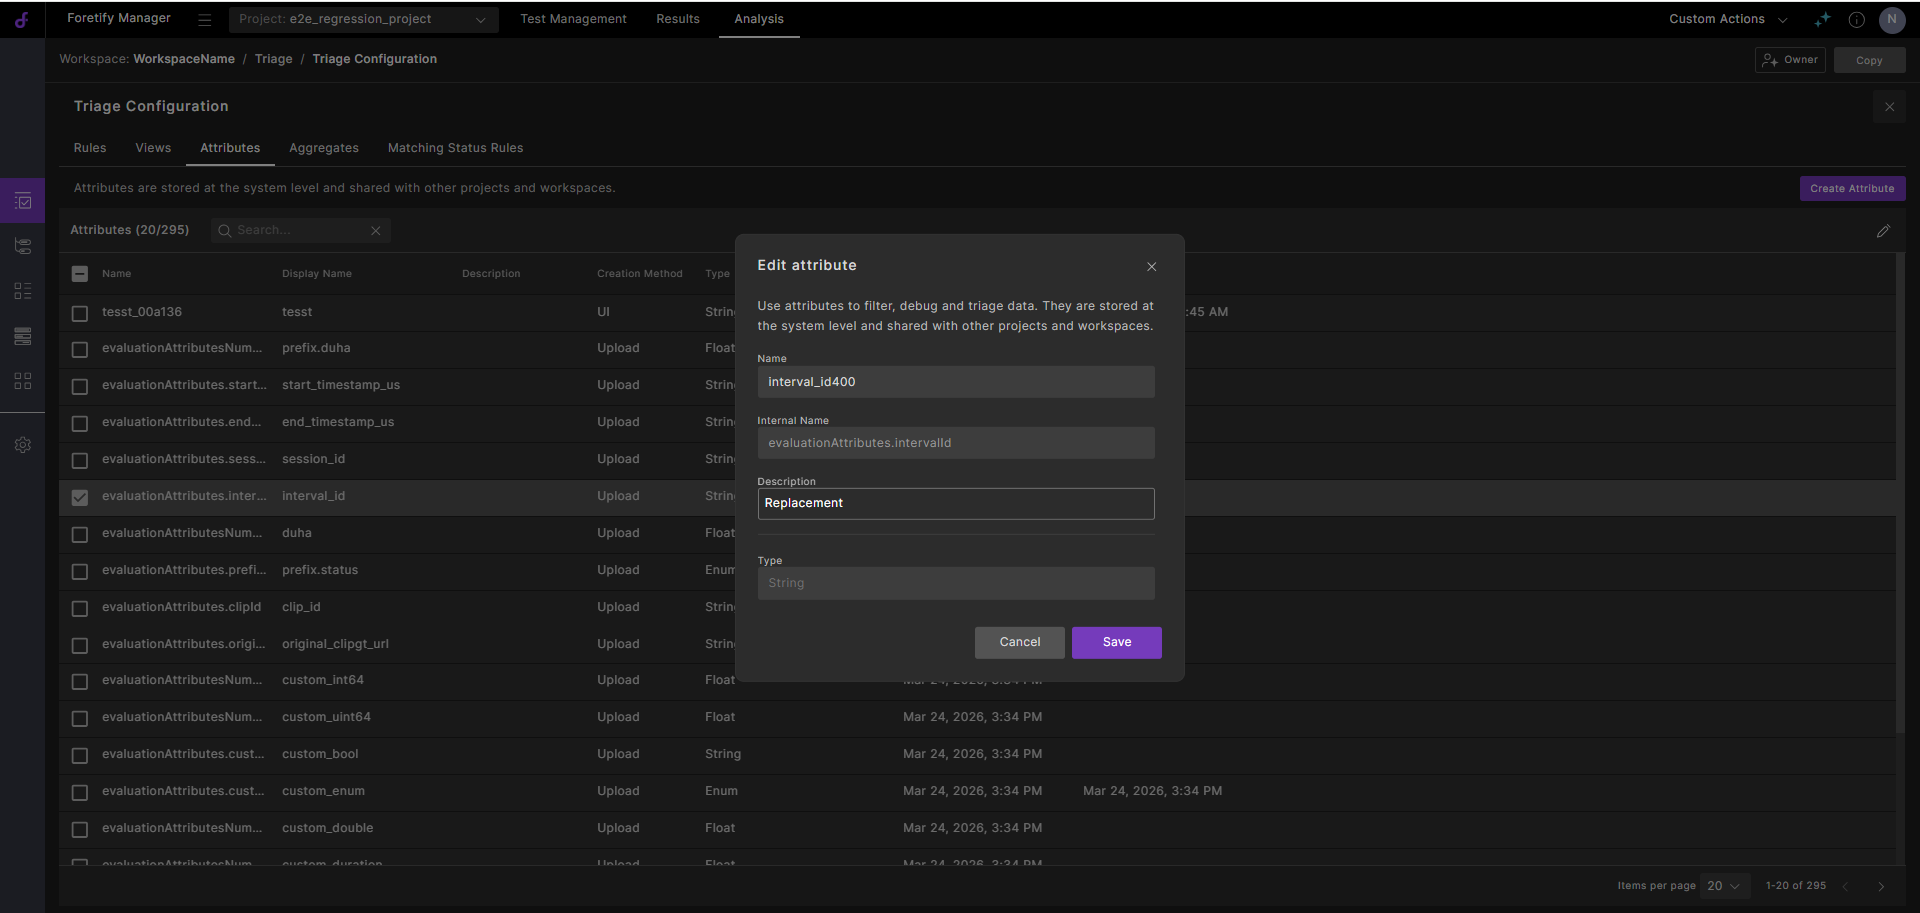
-
Click Save.
60.5 Set Triage attributes
You can set Triage attributes from the Triage Runs table or from a cluster.
Notes
- You must have editor or owner permission for the workspace to set an attribute.
- A rule is created whenever an attribute is set, so that the setting takes effect for future test suite results.
To set an attribute from the Runs table:
-
Select one or more runs, and then click the Set Attribute Value And Create A Rule icon located at the top right corner of the Runs table.
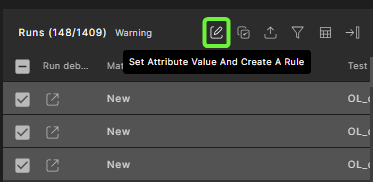
The Set Attribute dialog box indicates how many runs will be affected by your action.
-
Select an attribute from the Attribute dropdown list or start typing a known attribute name to choose from an auto-completed list of attributes.
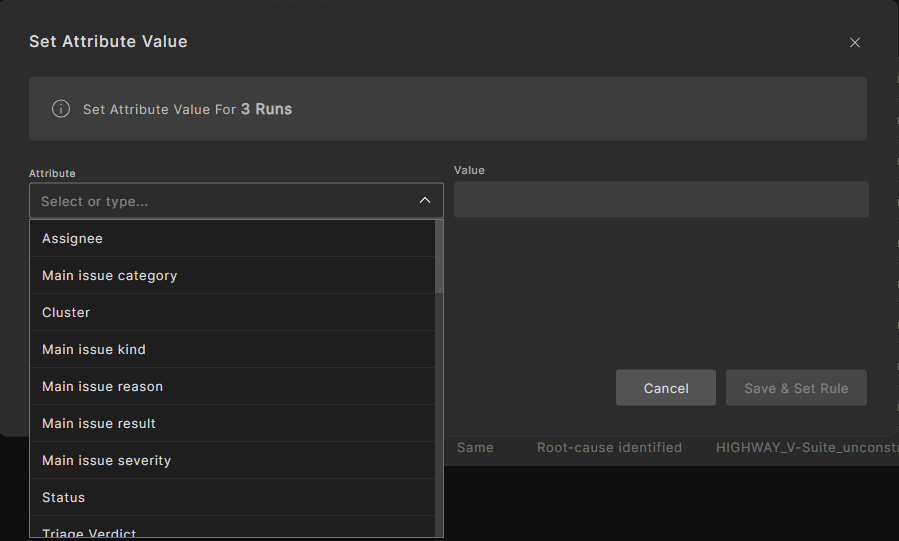
Note that you can create your own attribute and then set it.
-
Set a Value.
The value is applied to all selected runs.
-
Enter a Rule Name.
-
Select Save & Set Rule to save the rule, set the attribute, and re-run the entire rules calculation process.
You can hover over Preview rule to review the rule before applying.
For a large bulk of runs, it may take some time for the set operation to complete.
To set an attribute for all runs in a cluster:
-
In the Triage view, go to the Clusters pane, click the three dots (⋯) next to a cluster, and select Set Attribute Value and Create a Rule.
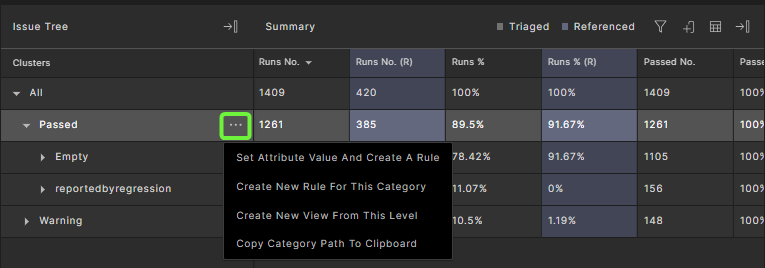
The Set Attribute Value dialog box indicates the scope on which the set operation will apply. The scope is determined by the cluster path, for example, "ERROR/other/out_of_odd".
Note
The three dots appear only if you have editor or owner permissions for the workspace.
-
Select an attribute from the Attribute list or start typing a known attribute name to choose from an auto-completed list of attributes.
Note that you can create your own attribute and then set it.
-
Set a Value.
-
Enter a Rule Name
-
Select the attribute's apply method:
- Select Save Rule to save the rule and set the attribute.
- Select Save Rule & Apply to save the rule, set the attribute, and re-run the entire rules calculation process.
You can hover over Preview rule to review the rule before applying.
-
Click Apply.
For a large bulk of runs, it may take some time for the set operation to complete.