89. CI/CD User Flows (Controlled Availability)
Controlled Availability (CA)
This feature is currently in Controlled Availability (CA) and is available only to a limited number of users for evaluation and feedback.
This section describes key workflows in Foretify Manager, including creating, executing, and managing tests and test suites for CI/CD and regression pipelines. These workflows use Smart Replay to capture, replicate, and validate AV behavior across diverse scenarios, enabling scalable, structured testing within CI/CD environments.
The architecture is explicitly designed for seamless CI/CD integration. Every stage — from log ingestion to scenario replay and automated reporting — can be invoked programmatically. This enables continuous, reproducible, and scalable validation of the AV stack as part of automated build-and-test processes. Each code change is rigorously evaluated in both real-world and synthetic contexts, forming an integral part of modern DevOps workflows.
89.1 Prerequisites for CI/CD Flows
Note
To access CI/CD functionality, you must first set up the Execution Manager and Apache Airflow.
89.2 Creating and running test suites for CI/CD
Foretify Manager provides robust tools for defining and managing tests and test suites. This capability is essential for implementing Continuous Integration/Continuous Deployment (CI/CD) pipelines and executing regression test suites to ensure the reliability and safety of AV systems throughout the development lifecycle.
89.2.1 Creating tests using Smart Replay
Smart Replay allows users to capture and precisely replay specific scenarios. This functionality is valuable in verifying the AV Stack's behavior in diverse safety and edge cases, and for introducing variations to further challenge the AV Stack's capabilities.
-
Add the data to Foretify Manager:
a. Ingest or match real world logs using the Foretify Evaluation Solution (ESR) Reference Kit
b. Run abstract scenarios at scale. For more information, see Launching a test suite.
c. Import scenarios from 3rd party tools.
-
Load a run or an interval into the Single Run Debugger.
-
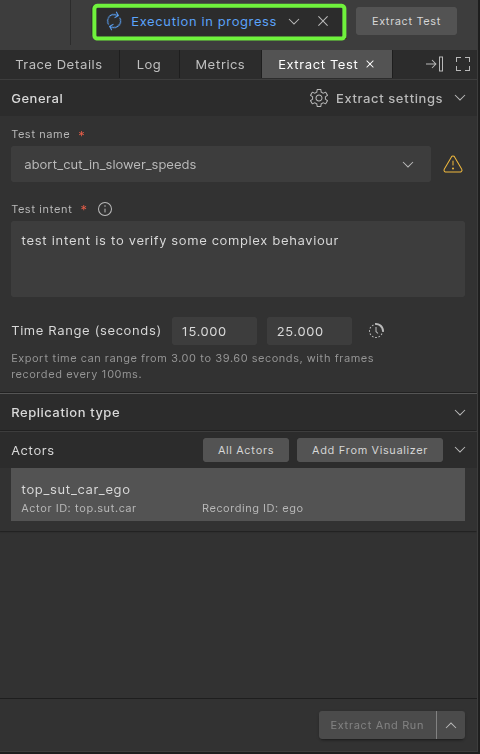
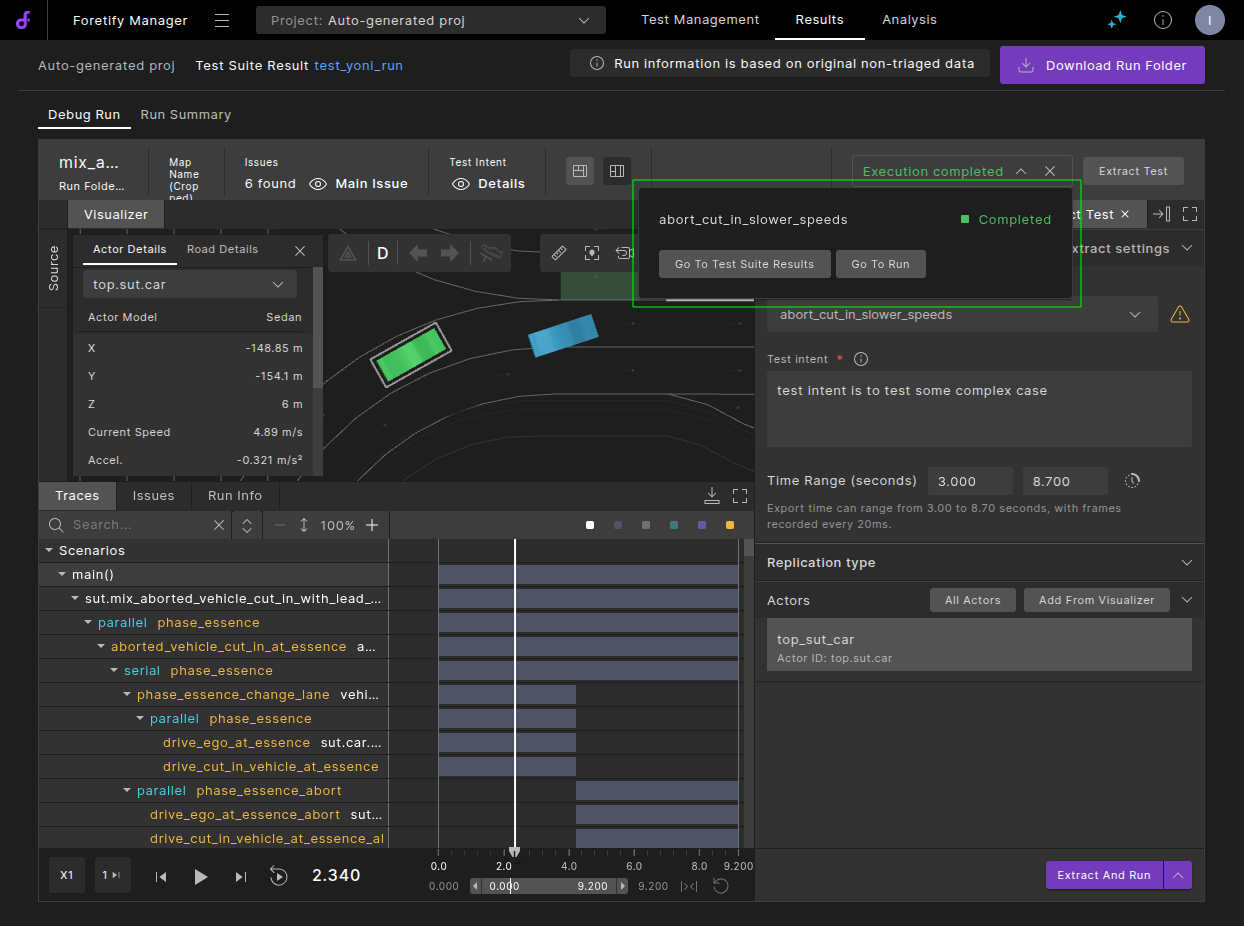
Identify an interesting time range or interval within the run, then click Extract test. For more information, see Exporting a scenario.
A new test is created and automatically executed within Foretify Manager with a progress bar tracking its progress.
Note
The new test precisely replicates the specified scenario segment, making it suitable for validating the specific scenario within CI/CD gating flow or broader regression jobs.
-
Add the data to Foretify Manager.
a. Ingest or match real world logs using the Foretify Evaluation Solution (ESR) Reference Kit
b. Run abstract scenarios at scale. For more information, see Launching a test suite.
c. Import scenarios from 3rd party tools.
-
Load a run or an interval into the Single Run Debugger.
-
Identify an interesting time range or interval within the run, then click Extract test. For more information, see Exporting a scenario.
A new test is created and automatically executed within Foretify Manager with a progress bar tracking its progress.
Note
The new test precisely replicates the specified scenario segment, making it suitable for validating the specific scenario within CI/CD gating flow or broader regression jobs.
-
Upon completion of the test extraction and execution, click the progress bar, then select Go To Run to view the results of the test extraction.
89.2.2 Managing tests
Once tests are available, you can organize them into a test suite. A test suite can be integrated into a CI/CD pipeline or used for broader regression jobs, such as daily or weekly runs.
The steps to create a test suite are as follows:
-
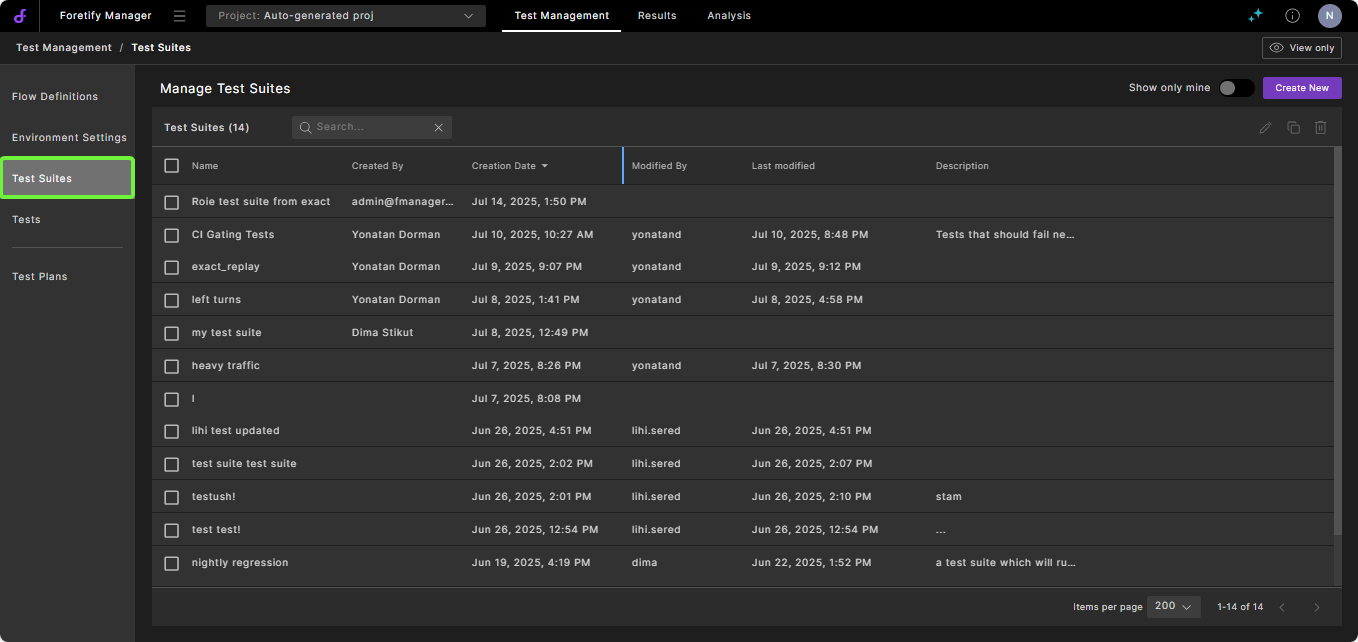
In the Foretify Manager project, click Test Management, then select Test Suites.
-
Click Create New or edit an existing test suite.
-
Provide a meaningful name and description.
-
Click Add test, then add relevant tests.
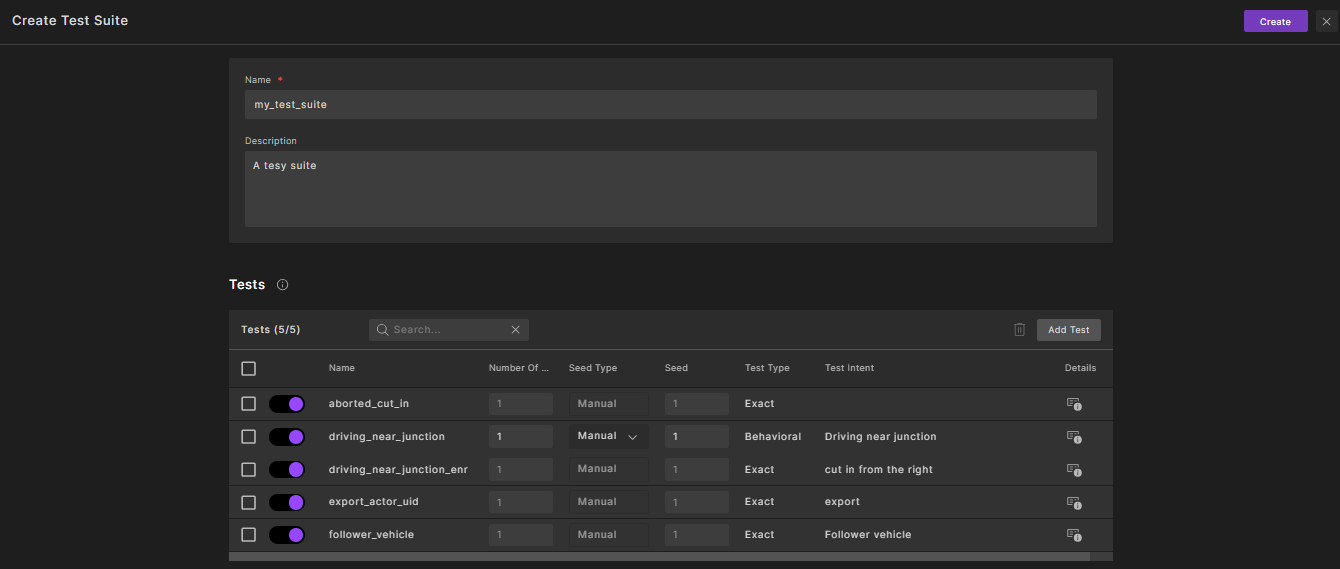
Note that in the example above, all tests run in "exact" replication mode, ensuring consistent environmental conditions across test runs, which is ideal for CI/CD jobs.
-
Click Create.
For behavioral tests, you can define the start seed and the number of runs to execute. You have two options for the seed:
- **Manual**: Specify a fixed random seed.
- **Random**: Automatically generate a new seed each time the test suite is launched.
89.2.3 Running tests
To execute a test suite, you need to create and launch a flow definition.
A flow definition describes how a scenario or suite of scenarios is executed. In Foretify Manager, this typically involves specifying the flow type (e.g., "Run test suite", "Extract and run test"), linking environment settings (container image, cloud repository, runtime options), and defining the exact sequence of tasks or modules to be run. Flow definitions act as the technical blueprint for scenario execution: they define how each scenario is run, what environments and resources are provisioned, and the step-by-step logic to execute simulations. A flow definition can be reused multiple times.
When creating or launching a Test Plan, you specify one or more flow definitions that dictate how the scenarios listed in the plan should be executed.
89.2.3.1 Managing flow definitions
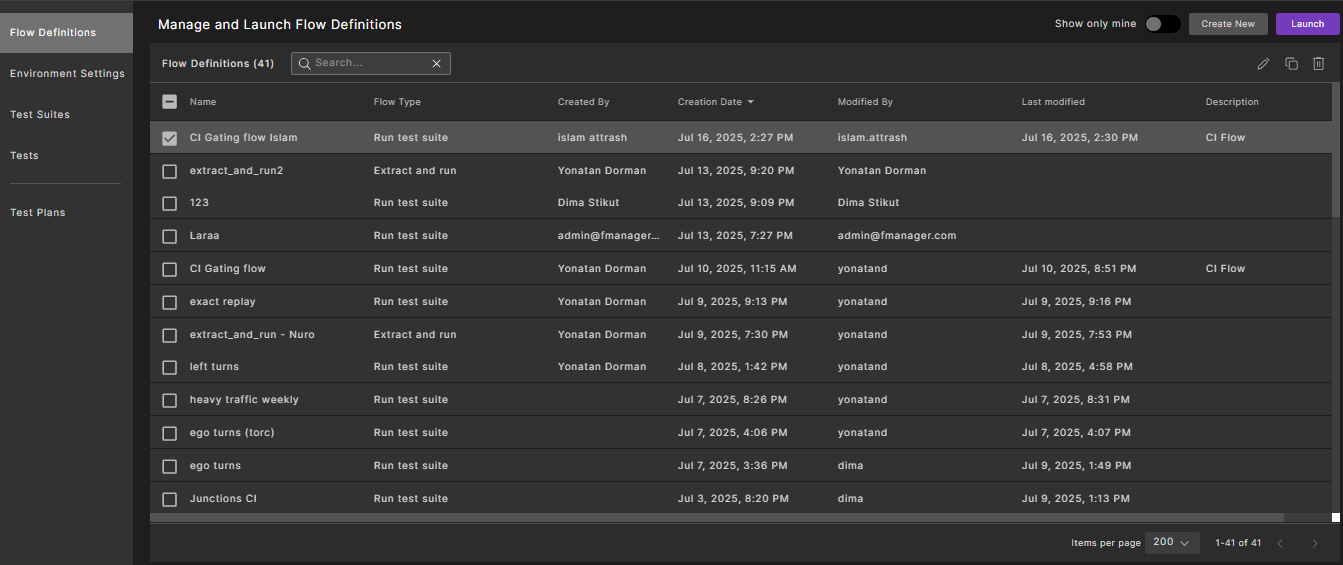
The Flow Definitions page displays all flow definitions you have access to.
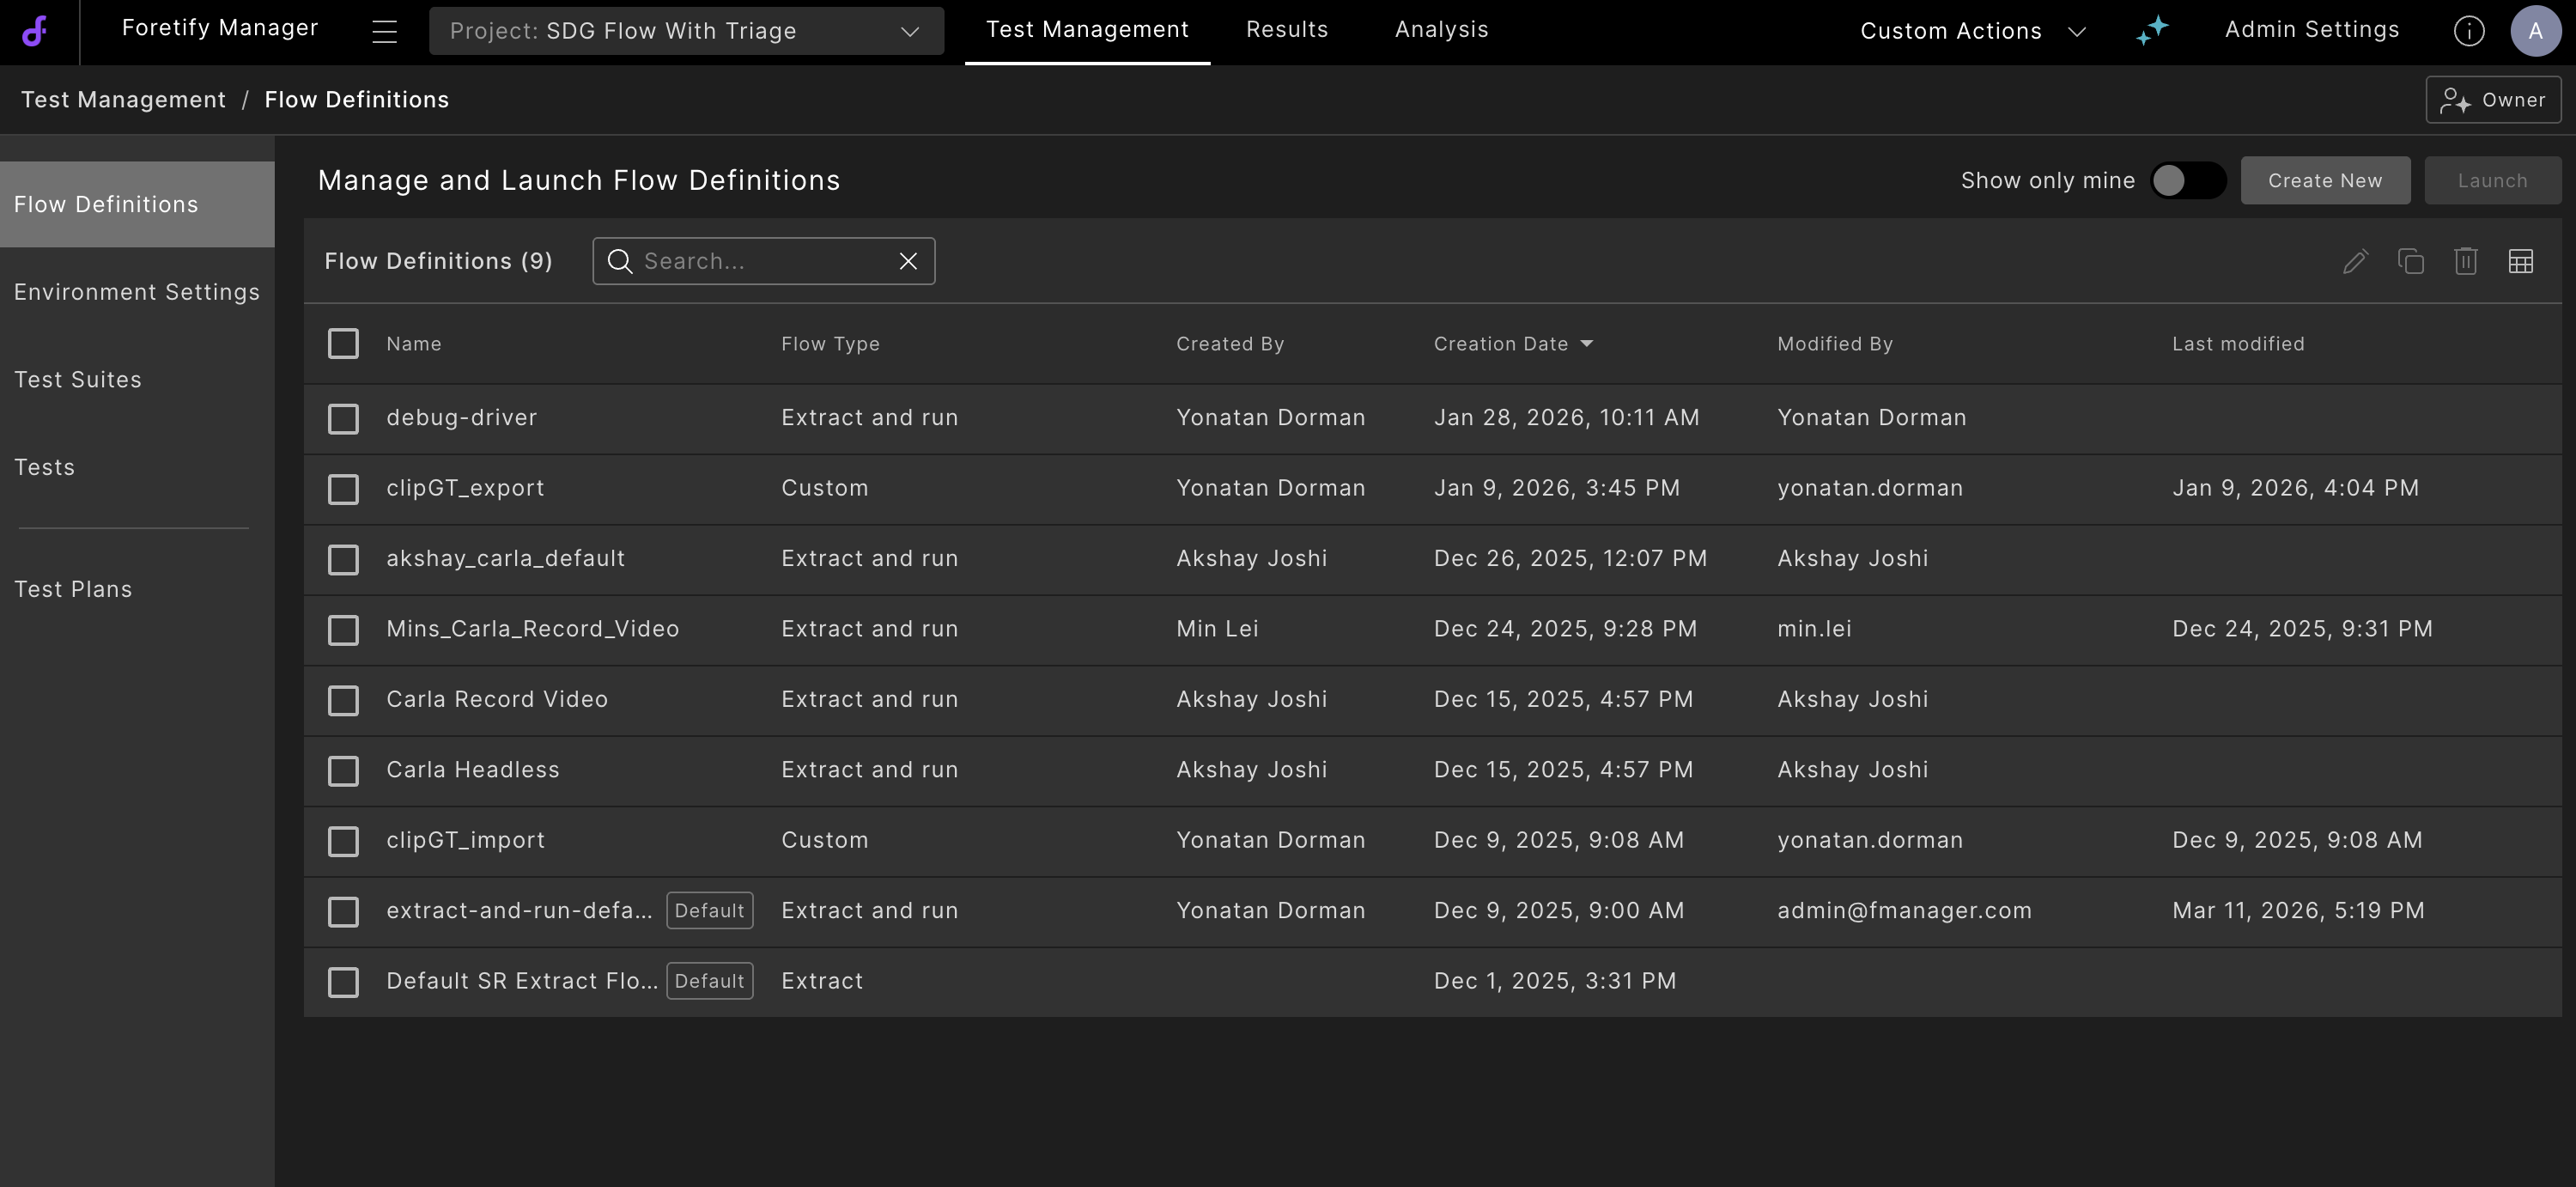
From this page you can:
- Search for flow definitions by name using the search bar.
- Filter to show only your own flow definitions using the Show only mine toggle.
- Copy an existing flow definition to create a new one based on its settings.
- Edit a flow definition (requires Editor permission).
- Delete one or more flow definitions using batch selection.
- Share a flow definition with other users. See Sharing Flow Definitions and Test Suites.
89.2.3.2 Creating flow definitions
-
Navigate to the Flow Definitions page and click Create New.
-
Provide a meaningful name and description.
-
Select the Flow Type. The available types are:
- Run Test Suite — Execute a suite of tests as part of CI/CD or regression pipelines.
- Extract and Run Test — Extract a scenario from an existing run and immediately execute it.
- Custom Job — Execute a custom script for specialized processing or integration workflows.

-
Select the appropriate Environment Settings, which specify how tests are executed, including Foretify, the simulator, and the AV stack versions, as well as cloud registry location and environment variables. For more information, see Environment Settings.
-
Optionally, add Labels to the flow execution to facilitate easier searching and retrieval of results.
-
Configure the type-specific settings as described in the following subsections.
-
Click Create.
89.2.3.2.1 Creating a Run Test Suite flow definition
When you select Run Test Suite as the flow type, you configure which test suites to execute when the flow is launched.
-
In the Test Suites section, select the test suites to include in the flow.
-
Click Create.
89.2.3.2.2 Creating an Extract and Run flow definition
When you select Extract and Run Test as the flow type, the flow definition is configured for extracting scenarios from the Single Run Debugger and immediately executing them.
-
Configure the Simulation Configuration settings as needed.
-
Optionally, select a Smart Replay Configuration to apply during extraction.
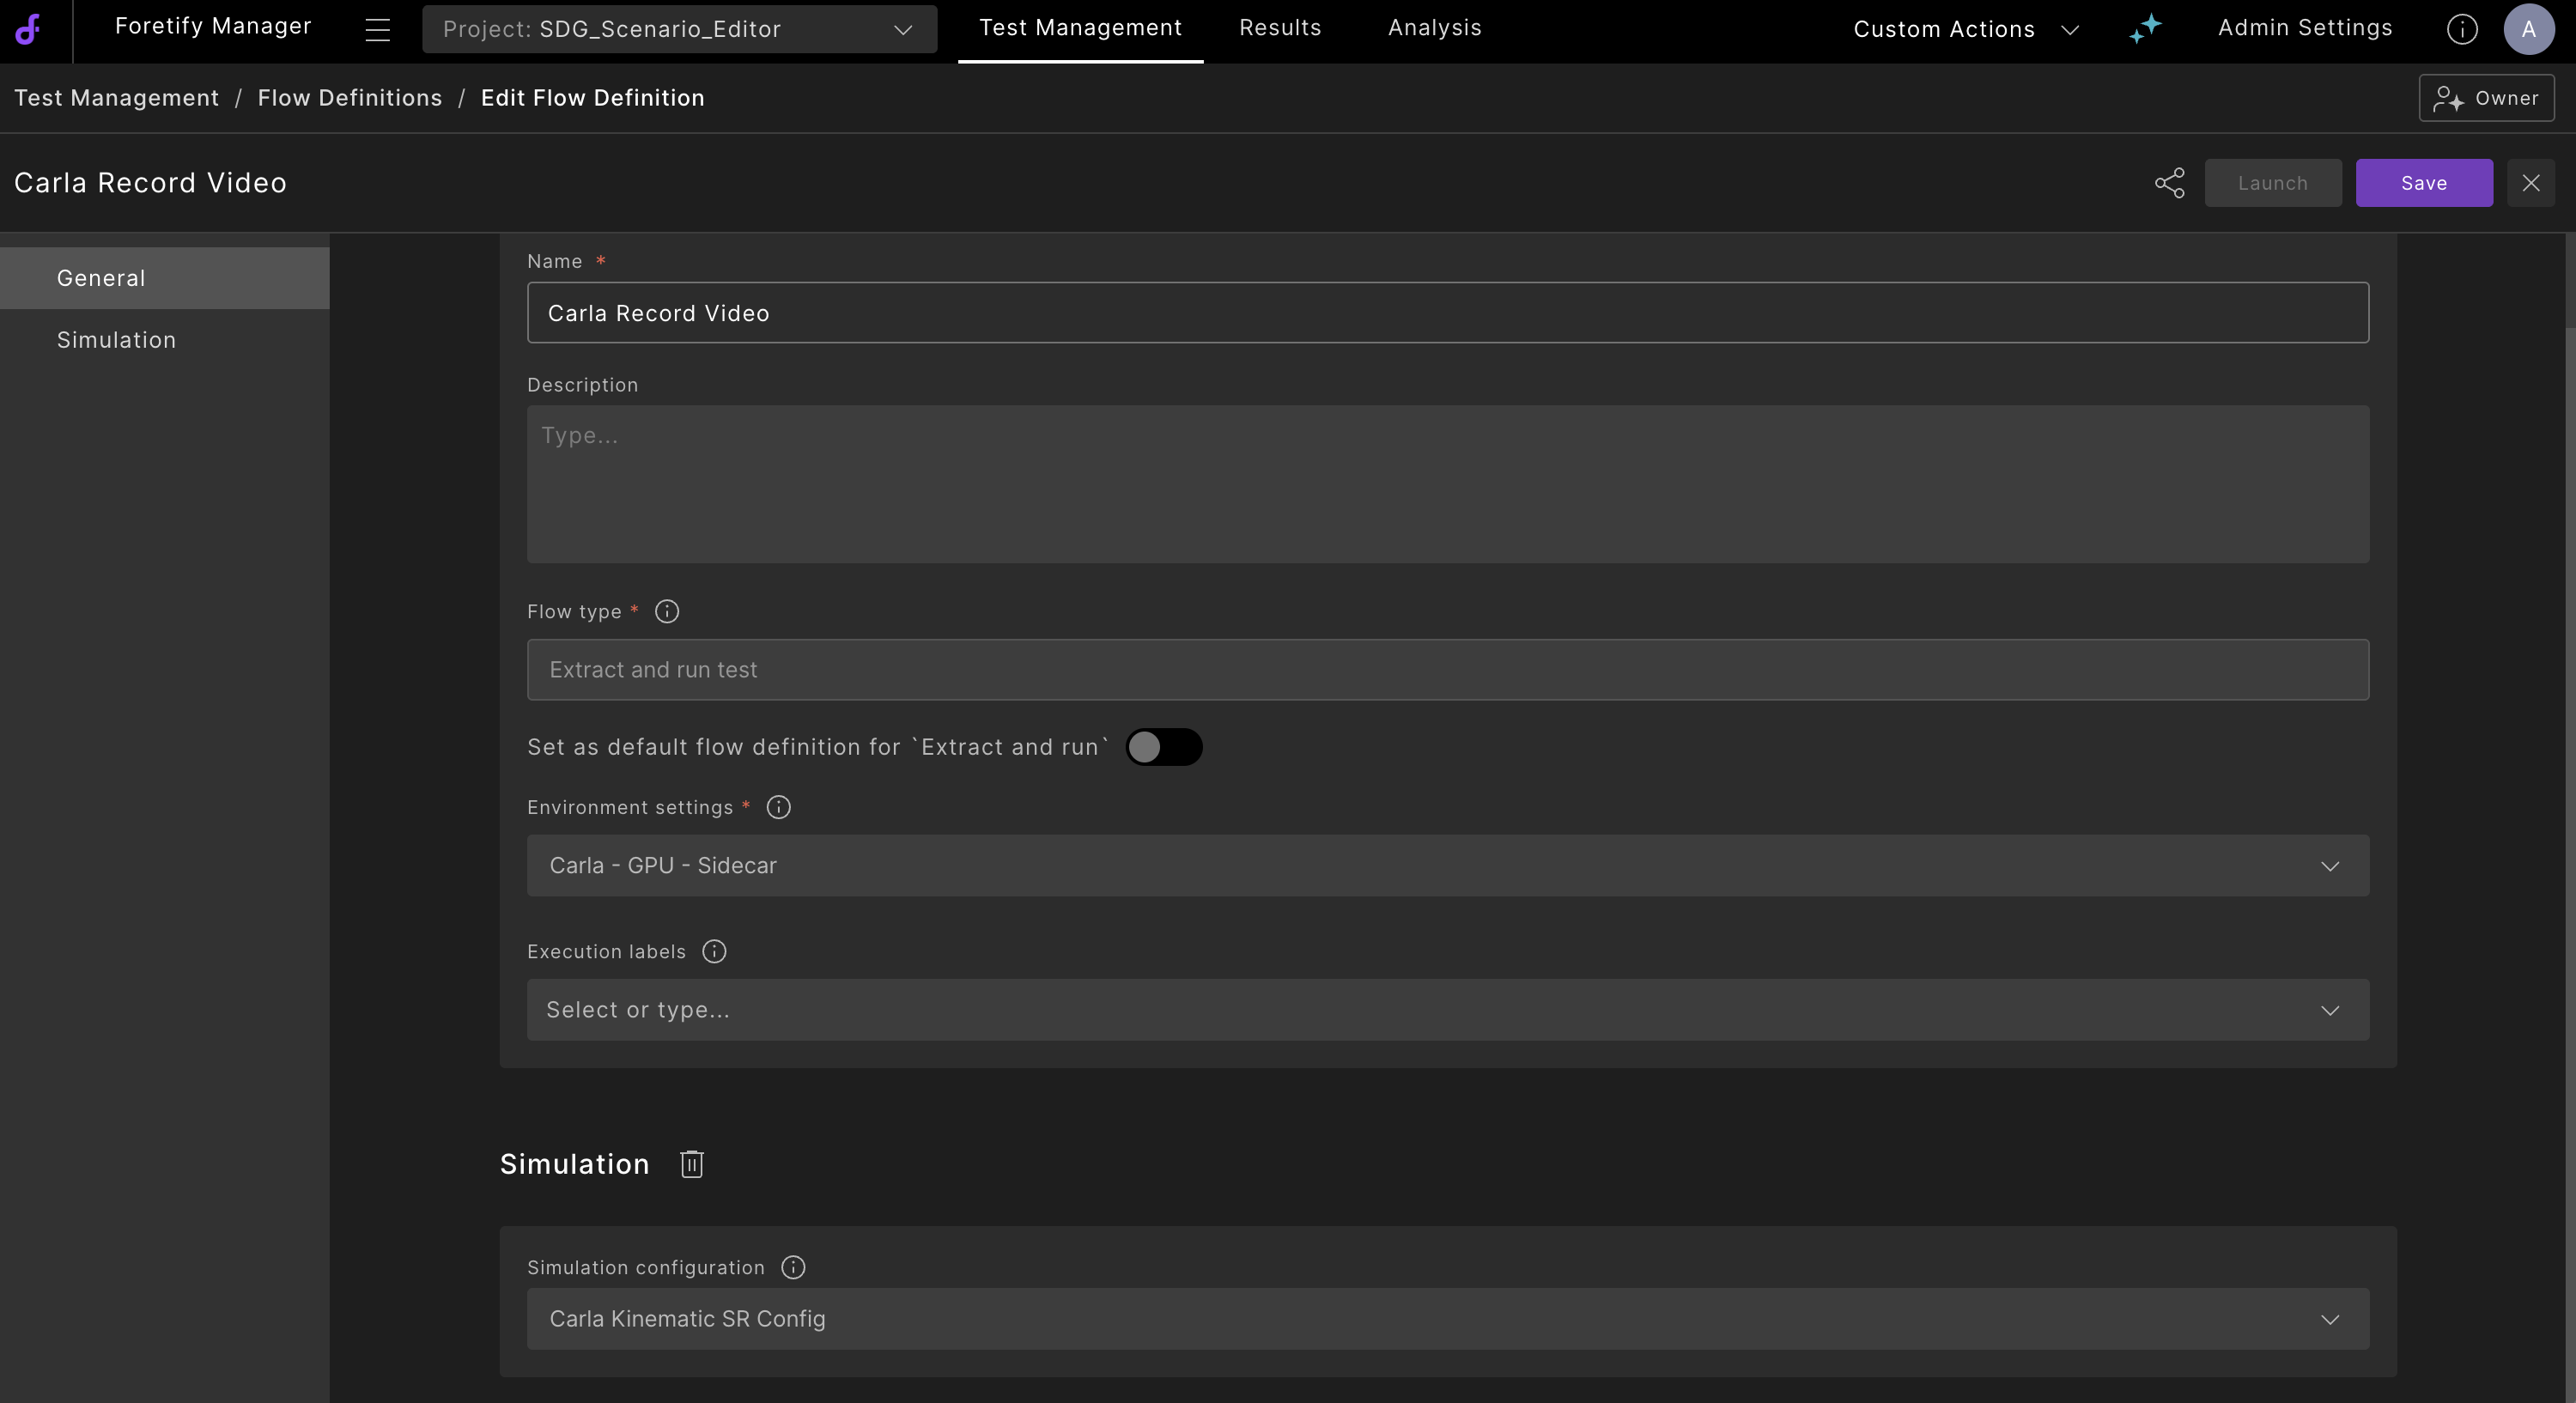
-
Click Create.
Tip
You can set an Extract and Run flow definition as the default for Single Run Debugger extractions. See Configuring the default Flow Definition for Single Run Debugger Extract and Run.
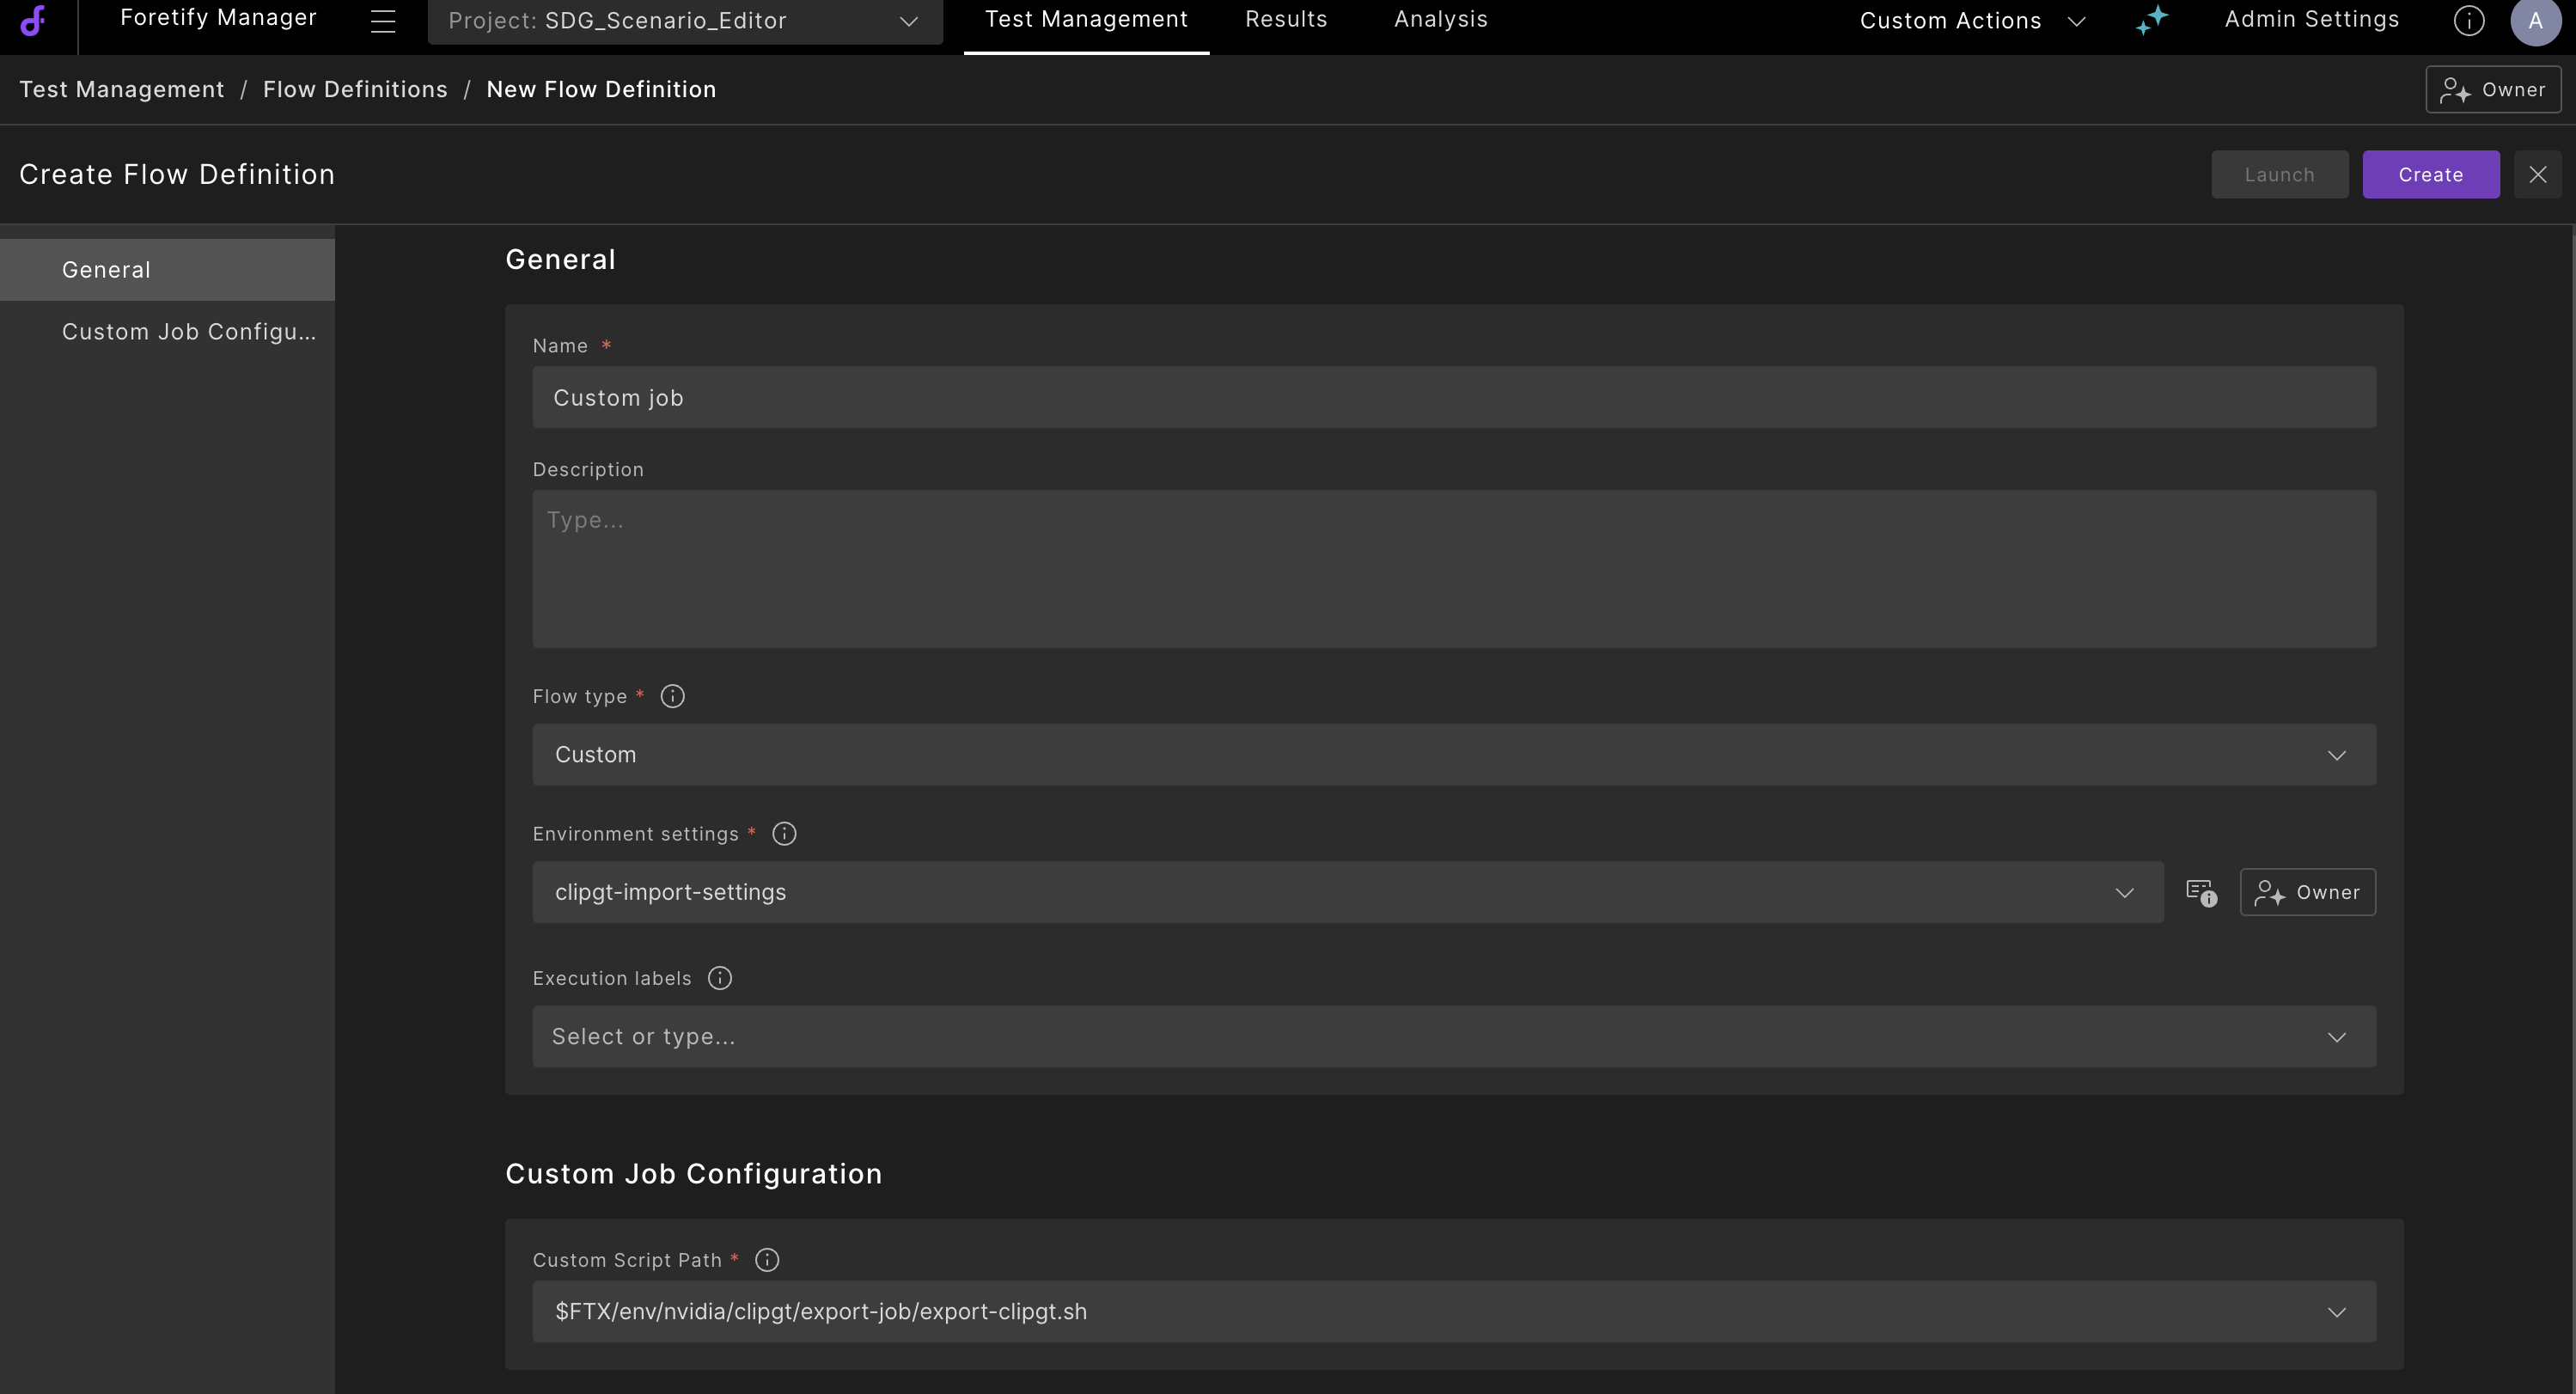
89.2.3.2.3 Creating a Custom Job flow definition
Custom Job flow definitions allow you to execute a custom script as part of your testing workflow. Use this flow type when you need to run specialized processing, custom analysis, or integration scripts that go beyond the standard test execution flows.
-
Select Custom Job as the Flow Type.
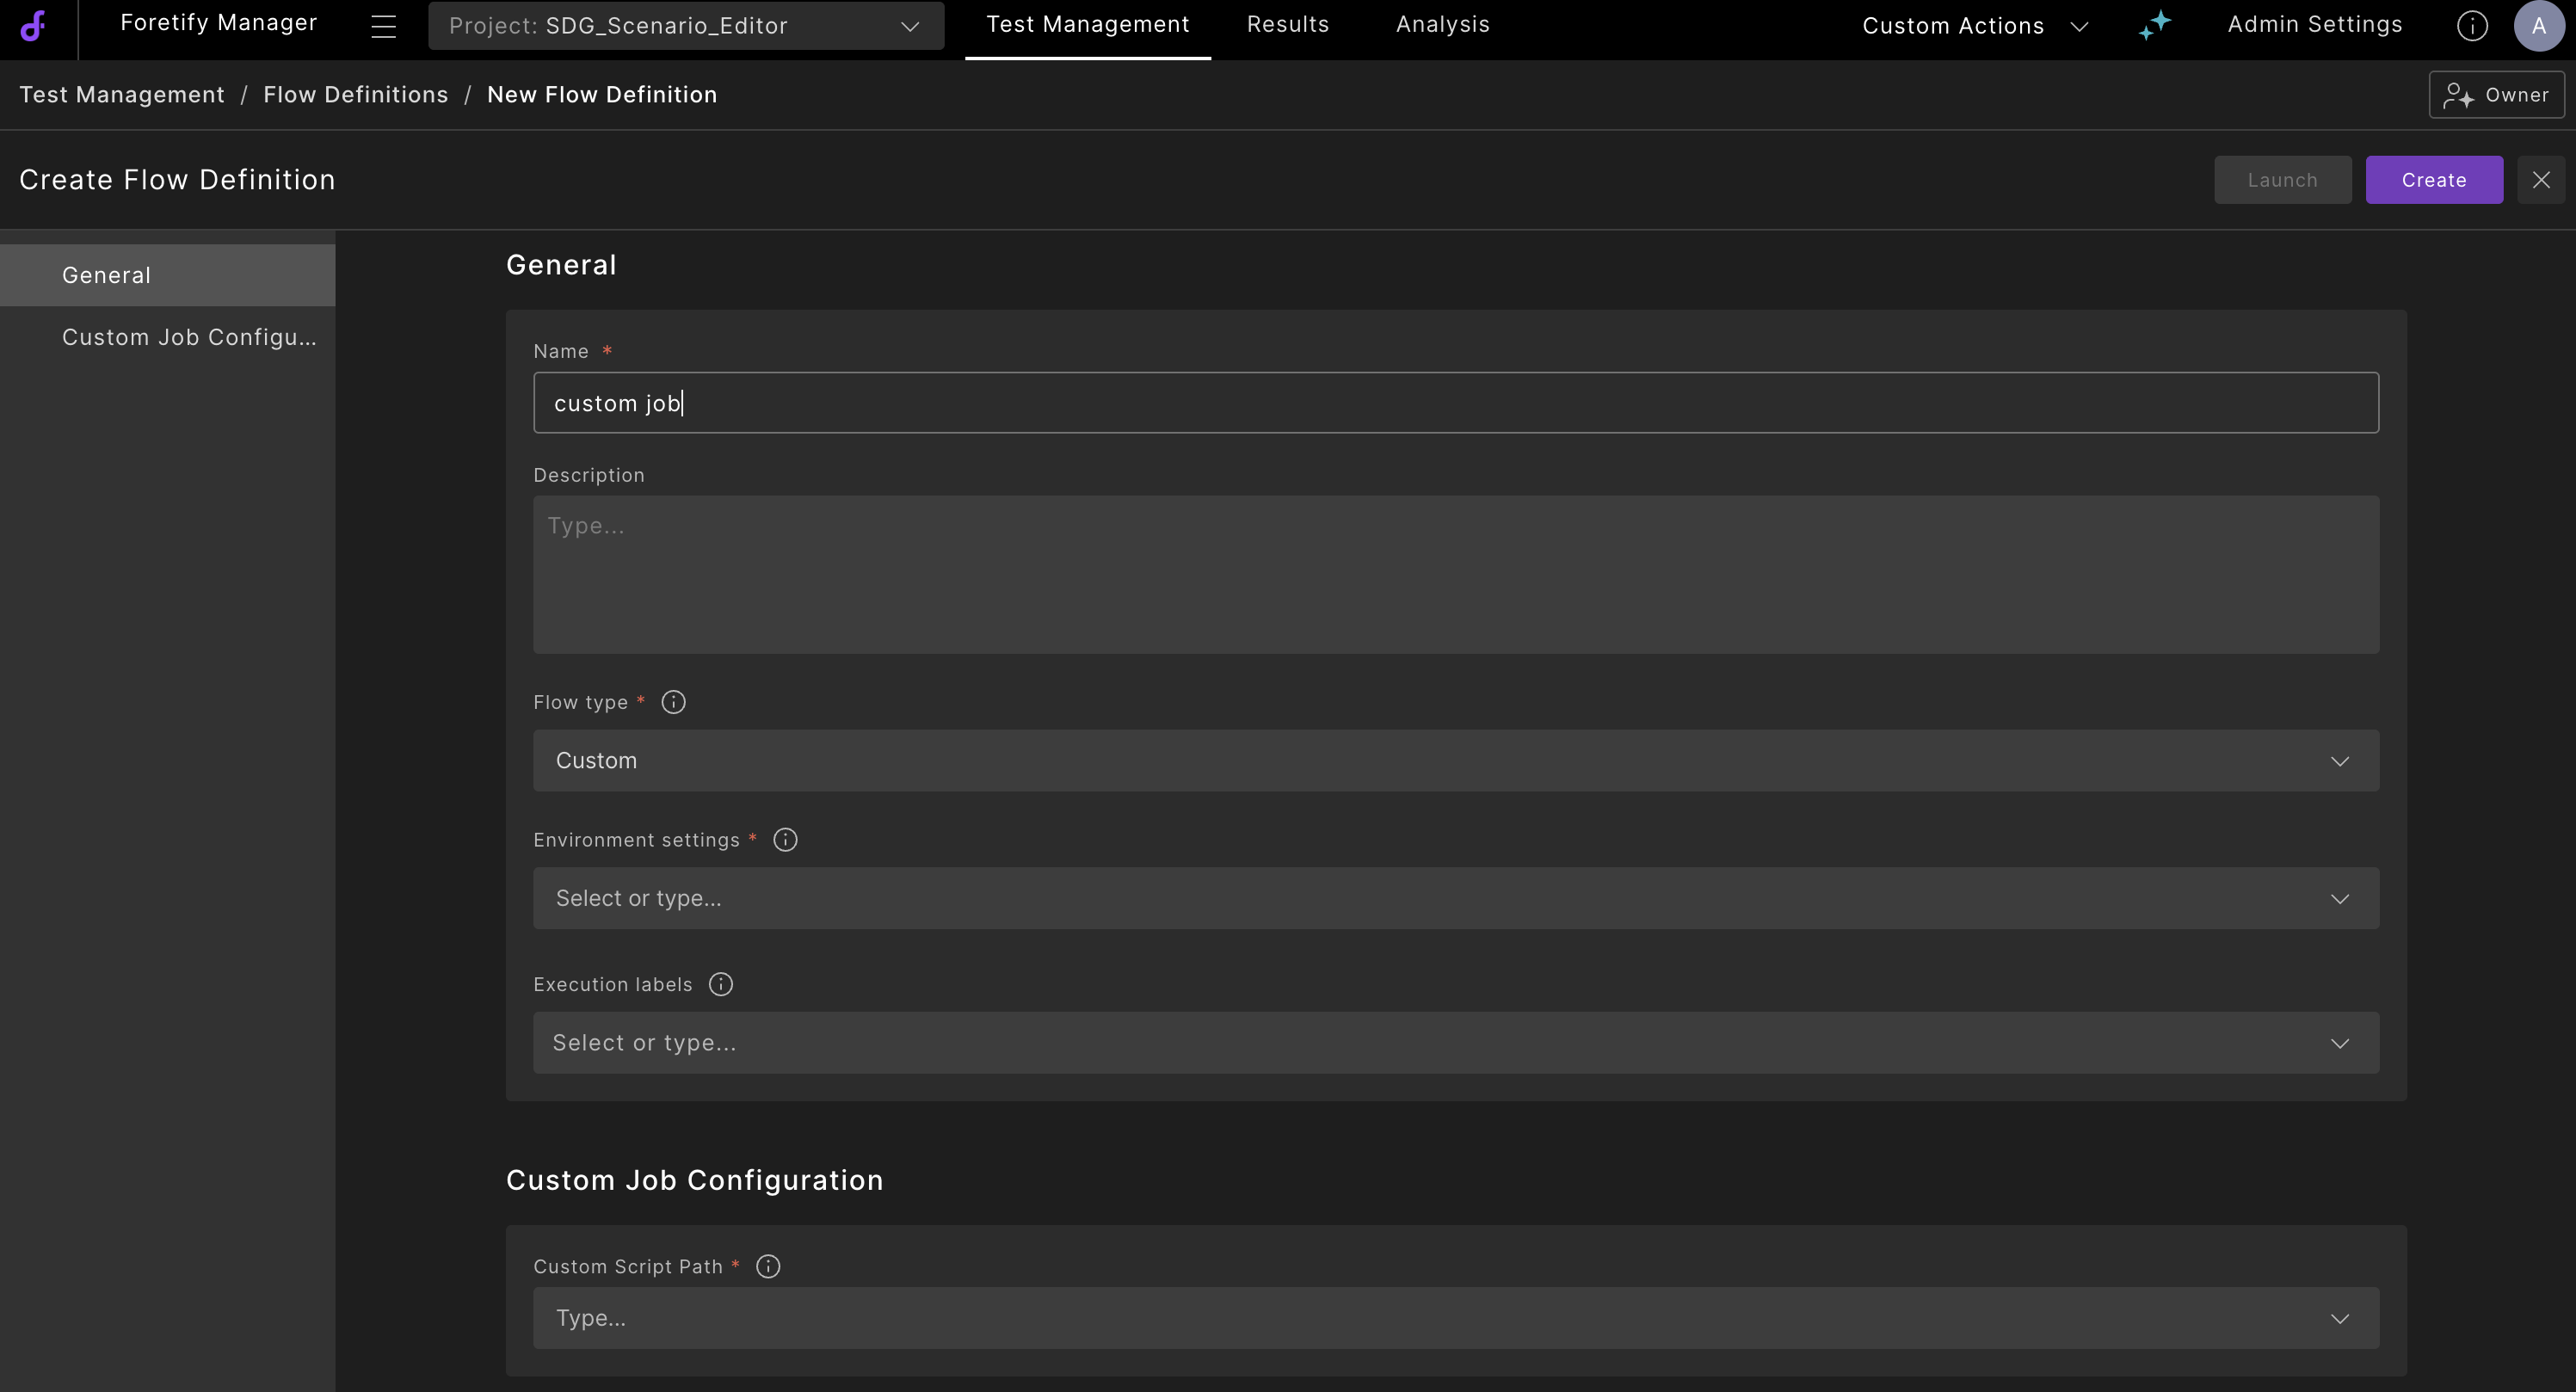
-
In the Custom Job Configuration section, enter the Custom Script Path. This is the path to the script that will be executed when the flow is launched. As you type, suggestions appear based on available scripts.

-
Click Create.
89.2.3.3 Running flow definitions
You can launch Run Test Suite and Extract and Run flow definitions directly from the Flow Definitions page.
Note
The Launch button is available only for Run Test Suite and Extract and Run flow definitions. Custom Job flow definitions are executed through other mechanisms.
-
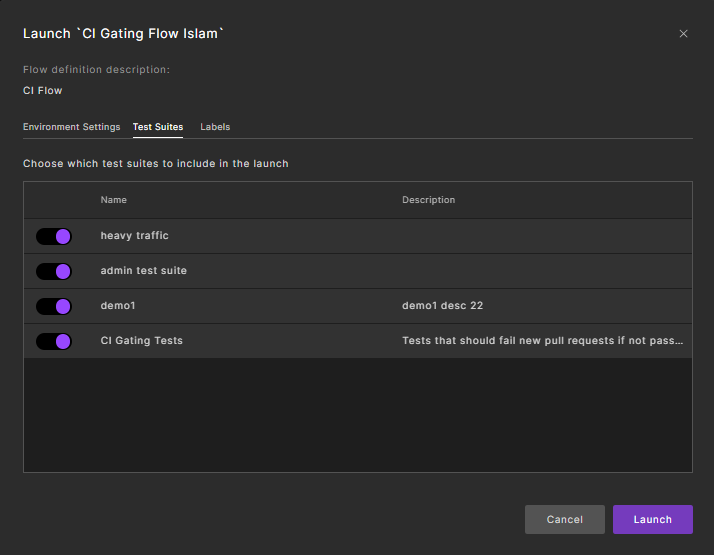
From the Flow Definitions page, select the flow and click Launch.
A launch dialog is displayed:
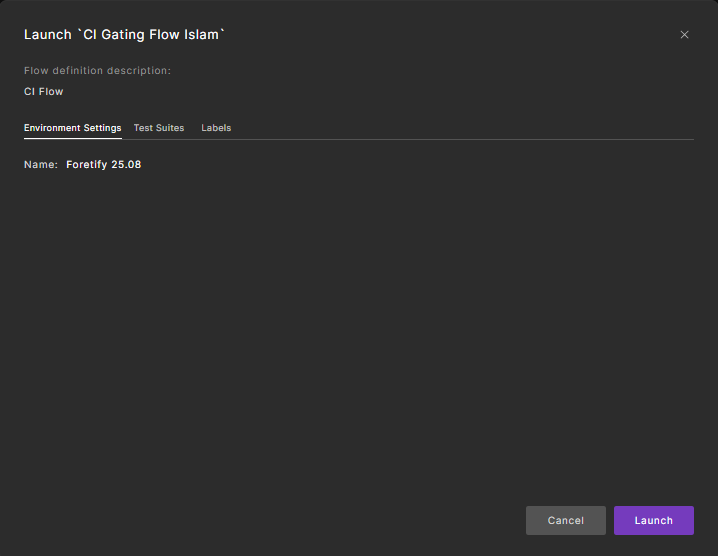
-
Click Launch to start execution immediately, or refine the flow parameters before launching. Available refinements include enabling or disabling test suites and adding or removing execution labels.
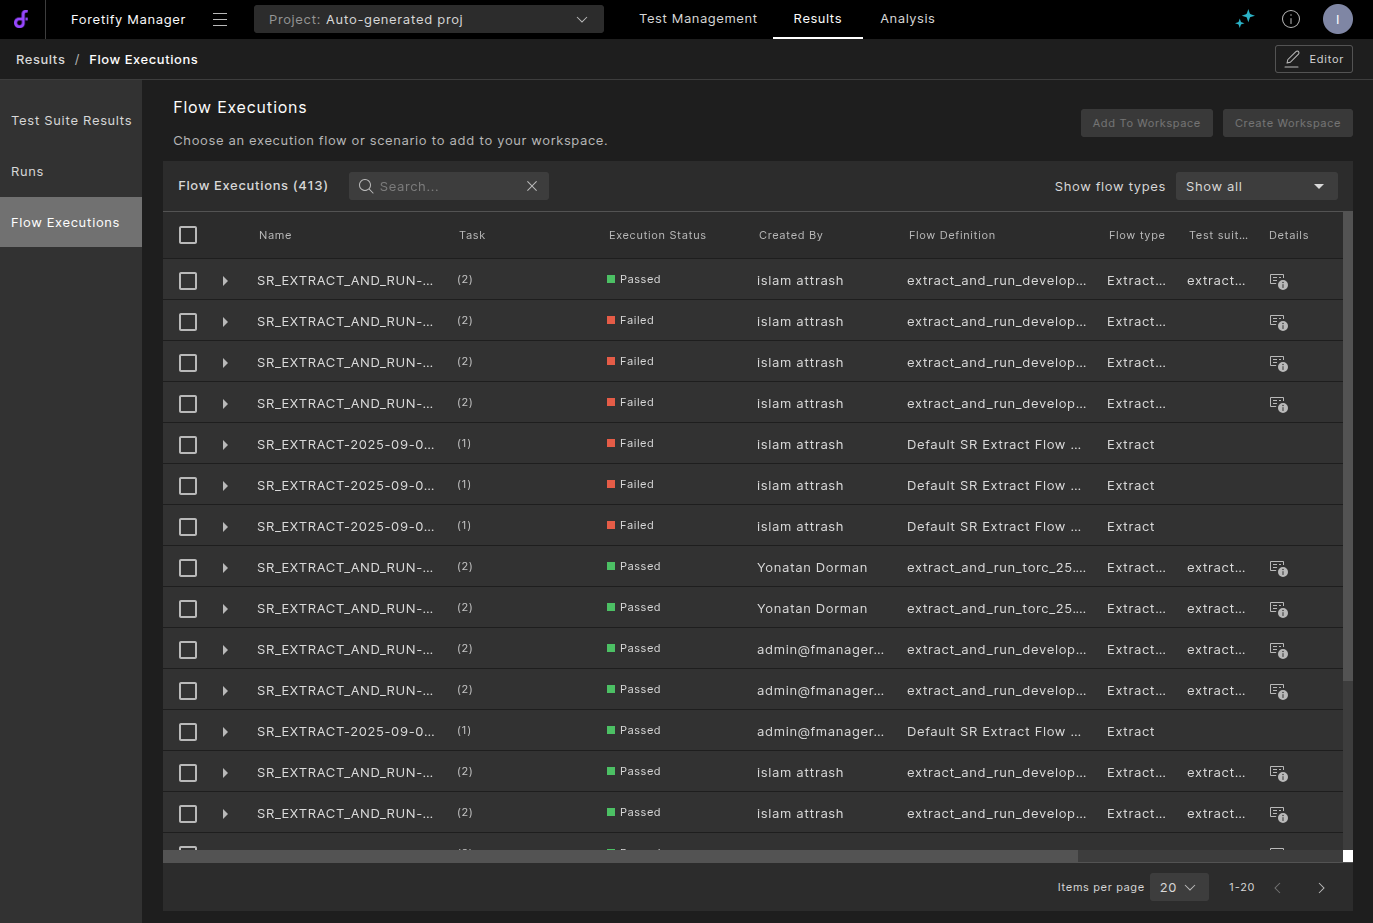
89.2.3.4 Managing flow execution
Clicking Launch redirects you to the Flow Executions page, where you can monitor the execution status and progress in real time.
- "Run test suite" flows comprise a single task.
- "Extract and run" flows, used for extracting and executing new tests as previously described, consist of two distinct tasks: extraction and execution.
After the execution task is complete, click the Test Suite Results link to begin analyzing the results.
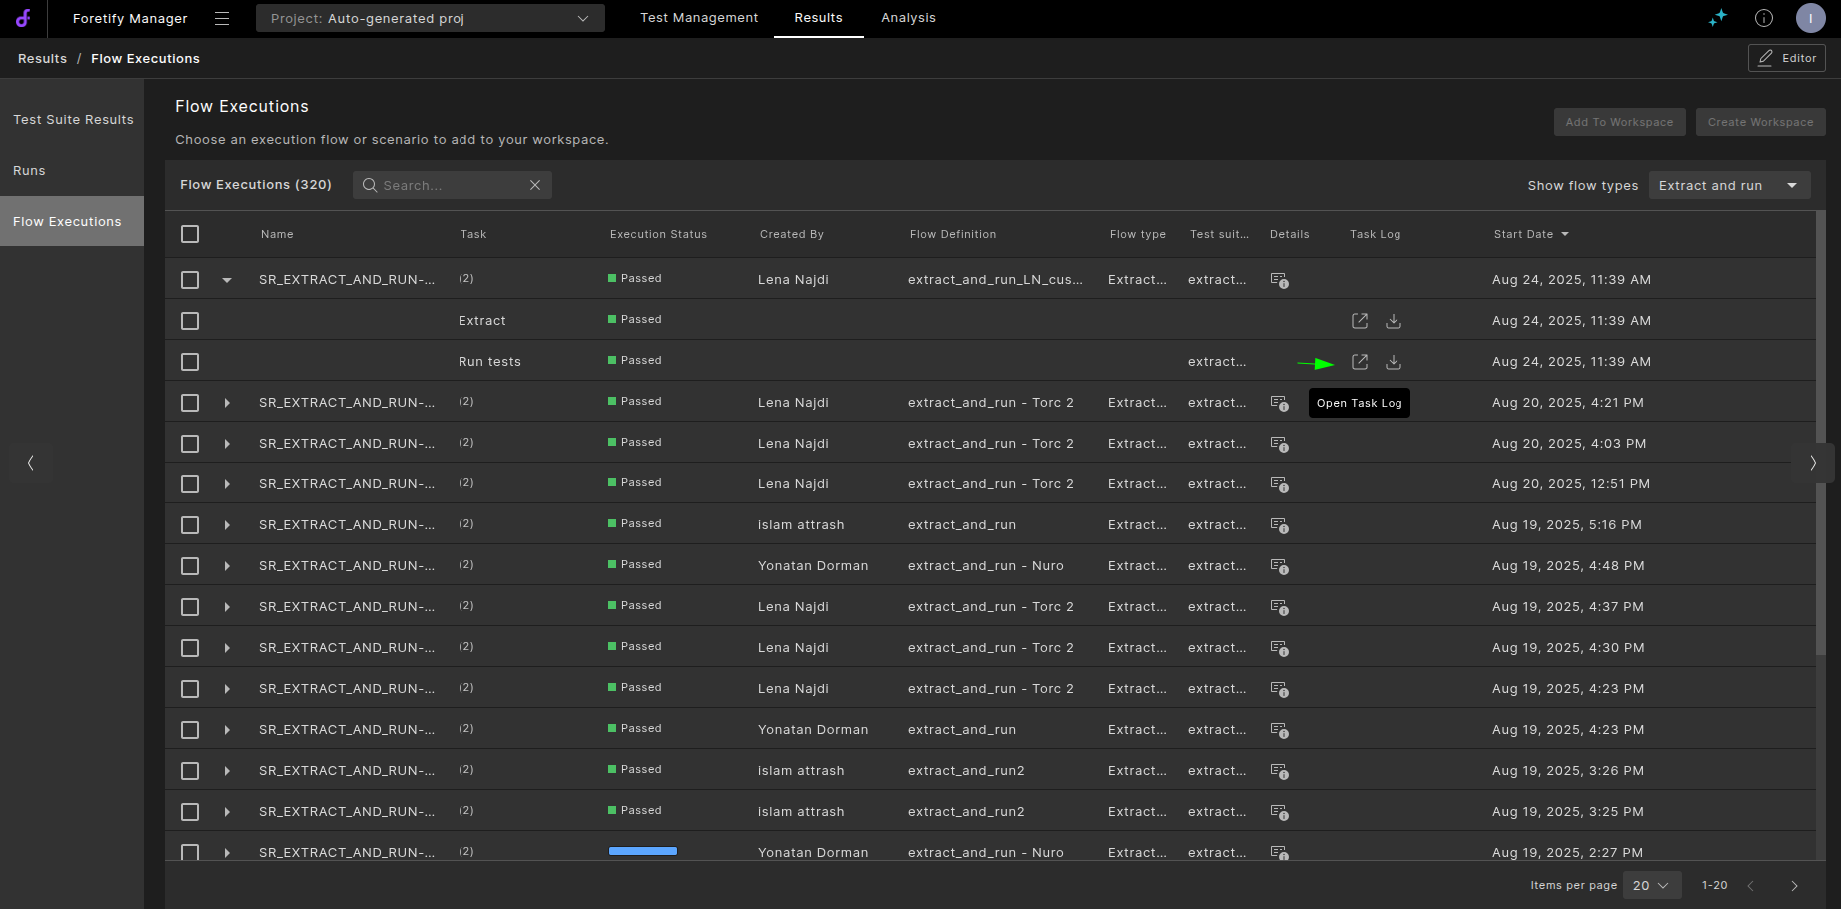
89.2.4 Task logs
During flow execution, detailed task logs are generated that provide comprehensive information about each execution step. These logs are essential for debugging, monitoring, and understanding the execution process.
89.2.4.1 Accessing task logs
-
Single task log: When a task generates a single log file, click the log icon in the Task Log column to view it in your browser or download it for offline analysis.
-
Multiple task logs: When a task generates more than one log file, click Multiple Logs in the Task Log column to open a modal displaying all available logs. From this modal, you can:
-
View individual logs by clicking the view icon next to each log entry
- Download specific logs by clicking the download icon next to each log entry.
89.2.4.2 Task log contents
Task logs contain detailed execution information including:
- Task execution progress and status updates
- Error messages and debugging information
- Performance metrics and timing data
- System-level execution details from the underlying Airflow workflow
These logs are particularly valuable for troubleshooting failed executions, optimizing performance, and maintaining audit trails for CI/CD compliance requirements.
89.3 Creating tests with variations using Smart Replay
Smart Replay is a powerful tool for generating diverse tests from existing scenarios, whether sourced from real-world data, third-party applications, or Foretellix’s abstract scenarios.
During scenario extraction you can modify parameters such as time range, actor selection, and warmup/cooldown periods to meet specific requirements. For more information, see Exporting a scenario.
After applying these modifications, the replication type transitions to behavioral, indicating that vehicles are controlled by the Foretellix driver.
To generate multiple variations, assign a unique seed to each test instance, using the actor modifier. Use the number of runs parameter to adjust the number of variations.
89.4 Admin Flow: Configuring the default Flow Definition for Single Run Debugger Extract and Run
When launching a scenario extraction from the Single Run Debugger, a preconfigured extract-and-run flow definition is used to streamline both extraction and execution. This approach ensures that users can initiate scenario extraction and testing efficiently, without needing to manually configure flow logic for each run.
To configure a default extract and run flow definition:
- Navigate to the Flow Definitions and create a flow.
- Select Extract and run test as the Flow Type.
- Configure the required environment settings.
-
Enable the option to Set as default flow definition for Extract and run.

-
Click Create.
By default, all extraction operations initiated from the Single Run Debugger use the designated flow definition. To override the default, navigate to the extract test settings page and select a different flow definition.

89.5 Sharing Flow Definitions and Test Suites
You can share flow definitions and test suites with other users by setting permission levels (VIEWER, EDITOR, OWNER) for specific users or groups.
89.5.1 How to Share Flow Definitions and Test Suites
-
Navigate to a Foretify Manager project, then click Test Management and open the flow definition or test suite you want to share.
-
Click the Share icon in the header.

-
In the Share dialog:
- Select users and groups, and assign permission levels.
- To enable organization-wide sharing, toggle Enable general access to the entire organization, including new users.
- Click Copy link to share the direct URL.

- Click Done to save.