70. Modify section attributes
VPlan section attributes are useful because you can create attribute filters that let you selectively view VPlan sections based on attribute values. For example, you can selectively view sections with the same Requirement ID attribute or with some other attribute specific to your project. You can modify section attributes, as well as create custom VPlan attributes.
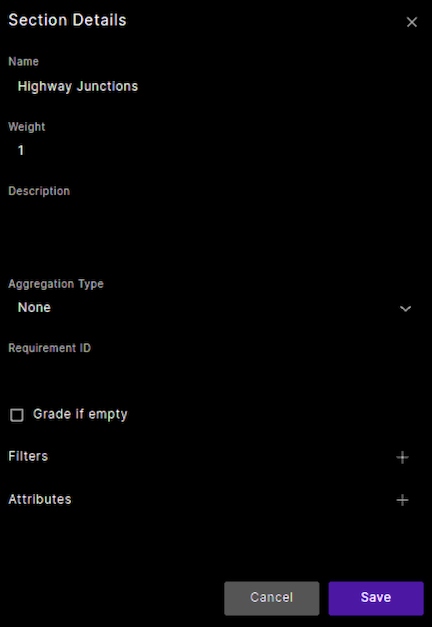
Clicking the More Details icon next to a section name lets you do the following:
- Change the weight of the section—how much it contributes to the coverage grade.
- Create filters so that only the items relevant to that section are displayed.
- Set attribute values for a section.
Figure 1 shows the Section Details form.
70.1 Filter items in a section
By default, all metric items sampled at a particular event are added to the section. You might want to filter out some of those items if they are not relevant for that section.
To create a filter for a section:
-
Click the More Details icon.
The Section Details dialog box opens.
-
Click the Add Filter (+) icon next to Filters.
The list of filters expands so that you can create a filter.
-
Select the name of the metric item you want to filter, the operator (Equals, Less than, and so on) and the value that you want to filter in or filter out.
The metric item name concatenates the <actor>.<scenario> name, for example sut.cut_in, with the sampling event, for example end, and the item name, for example side.
-
Click In or Out and click Save.
Note
In the VPlan Editor, you can also filter by editing the metric name in the VPlan Tree. For example, if you have an entry sut.vru_group_traveling_along_road_with_optional_crossing.*.*, you can filter it by replacing the first wildcard * with an event, in this case, end: sut.vru_group_traveling_along_road_with_optional_crossing.end.*. When you return to the VPlan, only the sut.vru_group_traveling_along_road_with_optional_crossing metrics associated with the end event are listed.
70.2 Change attribute values
You can modify the values of existing attributes for a section, and you can also apply any previously defined custom VPlan attribute to a section. See Create a custom VPlan attribute for more information.
To change the attribute values:
-
Click the More Details icon for the section.
The Section Details dialog box opens, displaying section attributes and filters.
-
Change the values of the displayed attributes of the section: Name, Description, Aggregation Type and so on.
70.3 Edit Grades
If you want the section to be graded 0 if it has no items, click Grade if empty. Otherwise, it will not be graded.
70.4 Edit Weights
The default weight of a section or item is 1. If a section or item is relatively more important to the overall VGrade than other sections or items, you can increase the weight proportionally.
You can edit the weight of each element in the VPlan tree (section, struct, group, or item) to affect the workspace VGrade.
- You can set valid weights (integer ≥ 1). The parent element will then recalculate its grade based on the updated weight.
- Weight edits are unique to the current VPlan view and do not affect other views or the base VPlan.
- Weights are visible in the main VPlan tree tab. You can reset a weight to its original value, either the default or the base VPlan value (for VPlan views).
70.4.1 Apply a custom attribute to a section
-
Click the Add Attribute (+) icon next to Attributes at the bottom of the Section Details dialog box.
-
Click the down arrow under the Name field and select the attribute you want to apply.
-
For Propagate, select True or False to choose whether to propagate the attribute to lower level sections.
-
Type in the value you want.
-
(Optional) For Attribute URL, enter the URL of a document that relates to the attribute.
-
Click Save.
For KPIs, the values for an item are aggregated across a run and sometimes a function such as minimum, maximum or average is applied to the aggregated value. The KPI must be defined correctly in OSC2 code. However, defining an aggregation type attribute for your KPIs in the VPlan enables you to create a filter and view KPIs by type.
KPIs are often defined using collect() to perform the aggregation and apply the function and record() to create the metric. Here is an example:
acc_max_acceleration: collect_acceleration(measure: max,
    exp: sut.car.state.acceleration,
    bad_is: high,
    threshold: max_allowed_acceleration,
    text:"The max acceleration is not is safe range of $(max_allowed_acceleration)",
    first_failure_kind: ACC_checks,
    first_failure_severity: warning,
    worst_failure_kind: ACC_checks,
    worst_failure_severity: warning)
record(acc_max_acceleration_recorded,
    exp: acc_max_acceleration.computed_result,
    unit: mpsps, text: "Maximum acceleration recorded")
In this example, measure: max applies the Max function.
The functions you can apply to an aggregation section include:
- None
- Average
- Min
- Max
- Standard deviation
- Variance
To define an aggregation type attribute for a section:
-
Create a VPlan section and include the items whose values you want to aggregate.
For example, you can create a section called Max Acceleration and include the item top.adas_info.end.acc_max_acceleration_recorded.
-
Click the More Details icon of the section to open the Section Details dialog box.
-
Open the dropdown list for Aggregation Type, select the function you want to apply and click Save.
Functions include Average, Min, Max, Standard deviation, and Variance. For the example above, select the Max function.
70.5 Create a custom VPlan attribute
In the workspace, you can filter the VPlan based on a custom VPlan attribute. For example, you can:
-
In the VPlan Editor, you can create a custom attribute, such as MATURITY_LEVEL, with appropriate predefined values such as high, medium and low, or 1, 2 and 3. This task is described below.
-
In the VPlan Editor, you can apply the attribute with a specific value to each appropriate VPlan section.
-
In the workspace, you can filter the VPlan to see sections with a specific maturity level. See Create VPlan attribute filters for information on how to filter the VPlan based on attributes.
To create a custom VPlan attribute:
-
At the top right of the VPlan tree pane in the VPlan Editor, click the Add VPlan Attribute icon.
The VPlan Attributes dialog box opens with a list of currently defined attributes.
Note
You can delete or modify the attributes in this list.
-
Click Create New Attribute.
The list of attributes expands.
-
Enter the name of the attribute, predefined values for the attribute and a description.
-
Click Save.