80. Using FRun
Creating tests, running tests one by one, examining coverage and then tweaking constraints is labor intensive. This work is necessary when developing a new test, but once a test is stable, you can automatically create and execute multiple versions of it using Foretify’s test runner, FRun.
FRun is a plugin-based test generator and runner. Currently the following plugins extend FRun to generate and execute constrained random tests:
-
The template plugin creates tests based on a test template and on the constraints that you specify for test parameters.
-
The sub plugin is used together with the template plugin. The sub plugin lets you separate out various aspects of the test, such as test configuration parameters, from the main test. This means, for example, that you can share various test configurations among all the scenarios in the library instead of defining them in every test.
-
The post plugin is used together with the template plugin. The post plugin lets you expand the test without editing it in order to specify, for example, additional configuration parameters for the SUT or for generation. The code specified for the post plugin is automatically expanded at the end of the test.
-
The basic plugin runs manually created tests multiple times, automatically generating different values for test parameters in each run.
The FRun invocation options let you specify:
- A run table that defines the tests you want to run.
-
The tasks you want to execute:
- Create the tests and exit.
- Create the tests, filter out those that don't compile, and exit.
- Create and run the tests in batch or interactively, with or without filtering.
-
The name and options for a custom runner.
For a description of all invocation options, see FRun invocation.
You can also use FRun with the Foretify Manager Dispatcher.
80.1 Example: all-in-one template
This example shows how FRun and the template plugin create tests from a single, all-in-one test template together with a single run table.
80.1.1 The test template for the lead_vehicle() scenario
The template, as shown below, defines the test parameters and how the parameters are used in the test.
| OSC2 code: template plugin example | |
|---|---|
1 2 3 4 5 6 7 8 9 10 11 12 13 14 15 16 17 18 19 20 21 22 23 24 | |
- Line 1 specifies that this file contains a test template.
- Lines 2 - 7 declare the test parameters.
- Line 9 specifies the start of the code that defines the test.
- Lines 11 - 12 import the simulator configuration file and the top-level file of the scenario.
- Lines 14 -15 specify the map to be used in the test.
- Lines 17 - 21 apply the constraint parameters to the scenario.
- Lines 23 - 24 invoke the lead_vehicle() scenario.
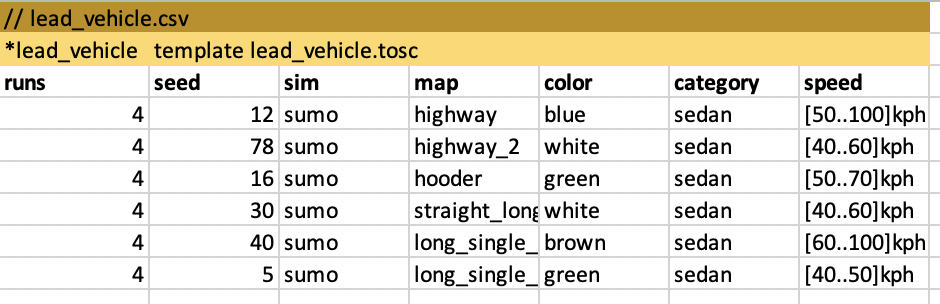
80.1.2 A run table for the lead_vehicle test
A run table defines a set of runs (a run group) for a single scenario.
This run table creates six tests (lines 4 - 9) using the parameters specified on that line. The runs parameter specifies the number of runs to make with each test. The seed parameter specifies the seed used to start generation in the first run. The seed is incremented for each subsequent run. In addition:
- The first row in the file is a comment specifying the name of the CSV file.
- The second line declares lead_vehicle as the name of this run group. The phrase template lead_vehicle.tosc activates the template plugin and specifies the name of the template file.
80.1.3 The command to create the tests
The --create option of FRun creates the tests, but does not execute them:
frun --create --csv lead_vehicle.csv --work_dir .
80.1.4 A sample test generated by FRun
Here is the test generated for line 4 of the run table shown above.
# lead_vehicle_4_1.osc
import "$FTX/config/sim/sumo_default.osc" # From: 'sim: sumo' from lead_vehicle.tosc
import "$FTX_PACKAGES/base_scenarios/scenarios/lead_vehicle/lead_vehicle/lead_vehicle_top.osc"


extend test_config:
    set map="$FTX_PACKAGES/maps/M73_FTX_highway.xodr" # From: 'map: highway' from lead_vehicle.tosc

extend sut.lead_vehicle:
    pass
    keep(speed in [50..100]kph) # From: 'speed: [50..100]kph' from lead_vehicle.tosc
    keep(lead_vehicle.color == blue) # From: 'color: blue' from lead_vehicle.tosc
    keep(lead_vehicle.category == sedan) # From: 'category: sedan' from lead_vehicle.tosc

extend top.main:
    do a: sut.lead_vehicle()
80.2 Example: sub templates
This example shows how FRun together with the template and sub plugins create tests from three test templates:
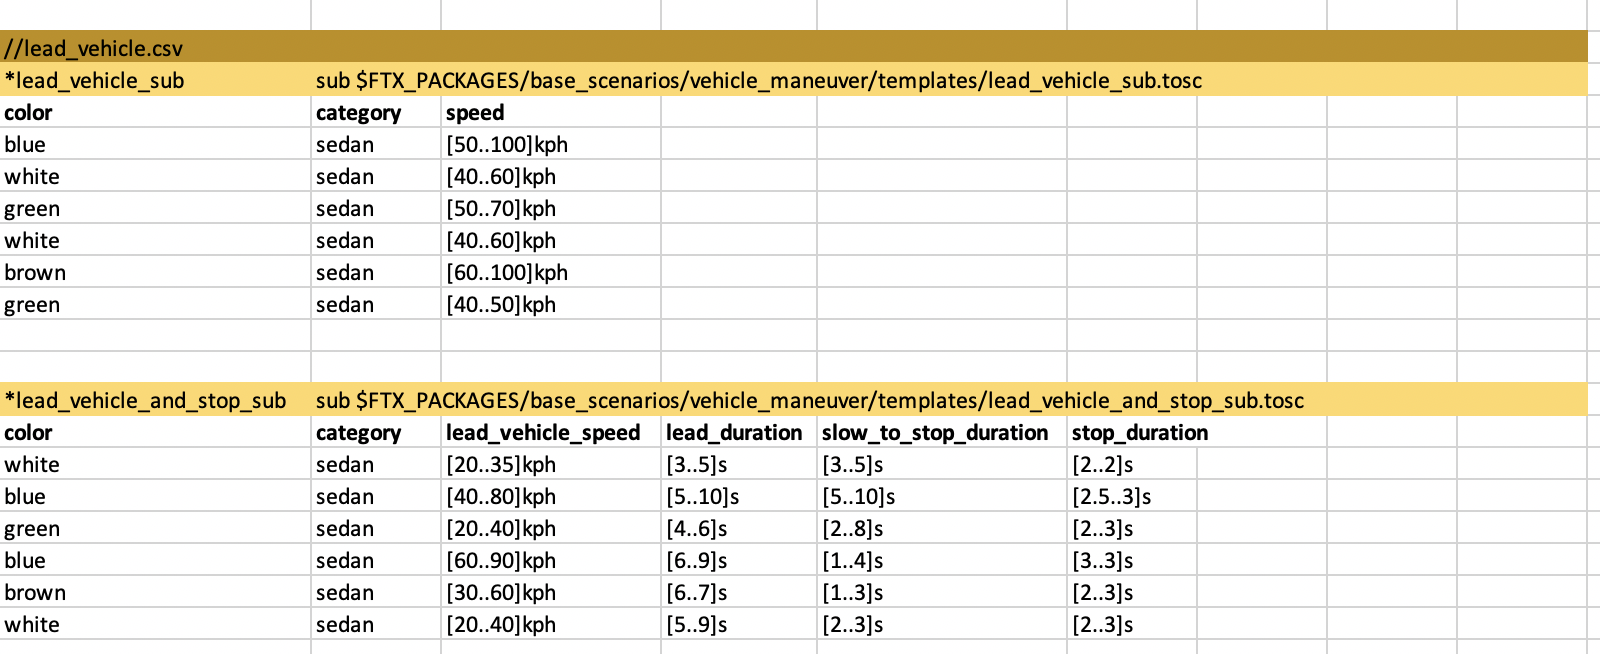
- The lead_vehicle sub template (lead_vehicle_sub.tosc) declares the scenario-specific parameters and defines the test.
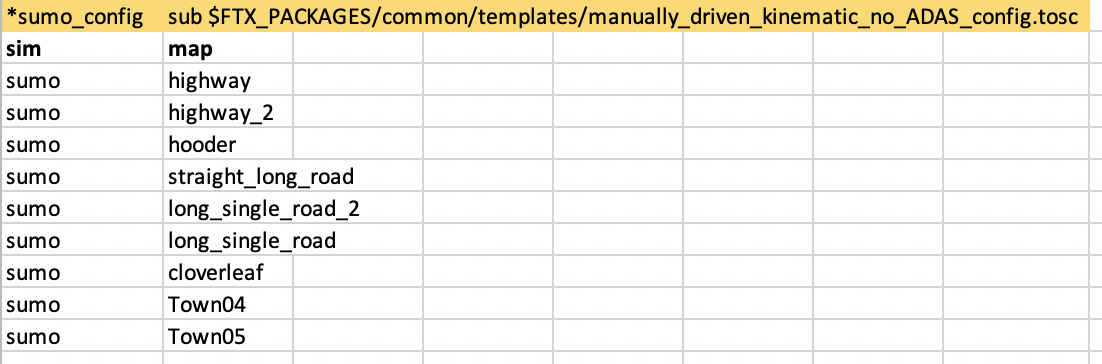
- The config sub template (manually_driven_kinematic_no_ADAS_config.tosc) declares the map- and simulator-specific parameters.
- The main template (lead_vehicle.tosc) declares and expands the sub and config templates.
There are three corresponding run tables:
- The lead_vehicle_sub run table (lead_vehicle.csv) defines the value ranges for the scenario-specific parameters.
- The sumo_config run table (sumo_manually_driven_kinematic_no_ADAS_config.csv) defines the value ranges for the map- and simulator-specific parameters.
- The main run table (lead_vehicle_main.csv) defines the number of runs for each generated test and the starting seed for the runs. For each test, it also specifies one or more lines from the sub and config run tables that define the value ranges for the map- and simulator-specific parameters.
Note
Although this example shows only two sub templates (with their corresponding sub tables), you can create as many sub templates (and corresponding sub run tables) as you like. For example, you can have one CSV file with map parameter values and a separate CSV file with simulator parameter values. In that case, you also need to create one template for the map parameters and a separate one for the simulator parameters.
80.2.1 The lead_vehicle sub template
Notice that in contrast to the all-in-one template, this template declares only the scenario-specific parameters. Otherwise, the syntax is similar to the all-in-one template, except that (\(sub()** is used instead of **\)\)template().
Note
The <role-type> parameter passed by $$sub() must match a parameter of the same name declared in the main template. See The main template for an explanation of this parameter.
# lead_vehicle_sub.tosc
$$sub(lead_vehicle):
    color: $$param() # Lead vehicle color
    category: $$param() # Lead vehicle type
    speed: $$param() # SUT and lead vehicle's speed throughout scenario

$$expand():

import "$FTX_PACKAGES/base_scenarios/scenarios/lead_vehicle/lead_vehicle/lead_vehicle_top.osc"

extend sut.lead_vehicle:
    pass
    keep(speed == $$(speed))
    keep(lead_vehicle.color == $$(color))
    keep(lead_vehicle.category == $$(category))
80.2.2 The config sub template
This template declares two parameters, sim and map and then defines the OSC2 code that uses those parameters.
# manually_driven_kinematic_no_ADAS_config.tosc
$$sub(config):
    sim: $$param()
    map: $$param()

$$expand():

import "$FTX/config/sim/$$(sim)_default.osc"

extend test_config:
    set map="$FTX_PACKAGES/maps/$$(map).xodr"
80.2.3 The main template
The main template uses the $$template() construct, defines two parameters, config and lead_vehicle, and then defines the OSC2 code that uses those parameters.
The syntax for the parameter declaration is:
<role-name>: $$sub_table(<role-type)
In the main template, the <role-name> parameter in the declaration must match the <role-name> passed by $$(<role-name>) in the expansion section. The <role-type> parameter declared in the main template must match the <role-type> passed by $$sub(role-type>) in the sub template.
# lead_vehicle.tosc
$$template():
    config: $$sub_table(role: config)
    lead_vehicle: $$sub_table(role: lead_vehicle)

$$expand():

$$(config)
$$(lead_vehicle)

extend top.main:
    do a: sut.lead_vehicle()
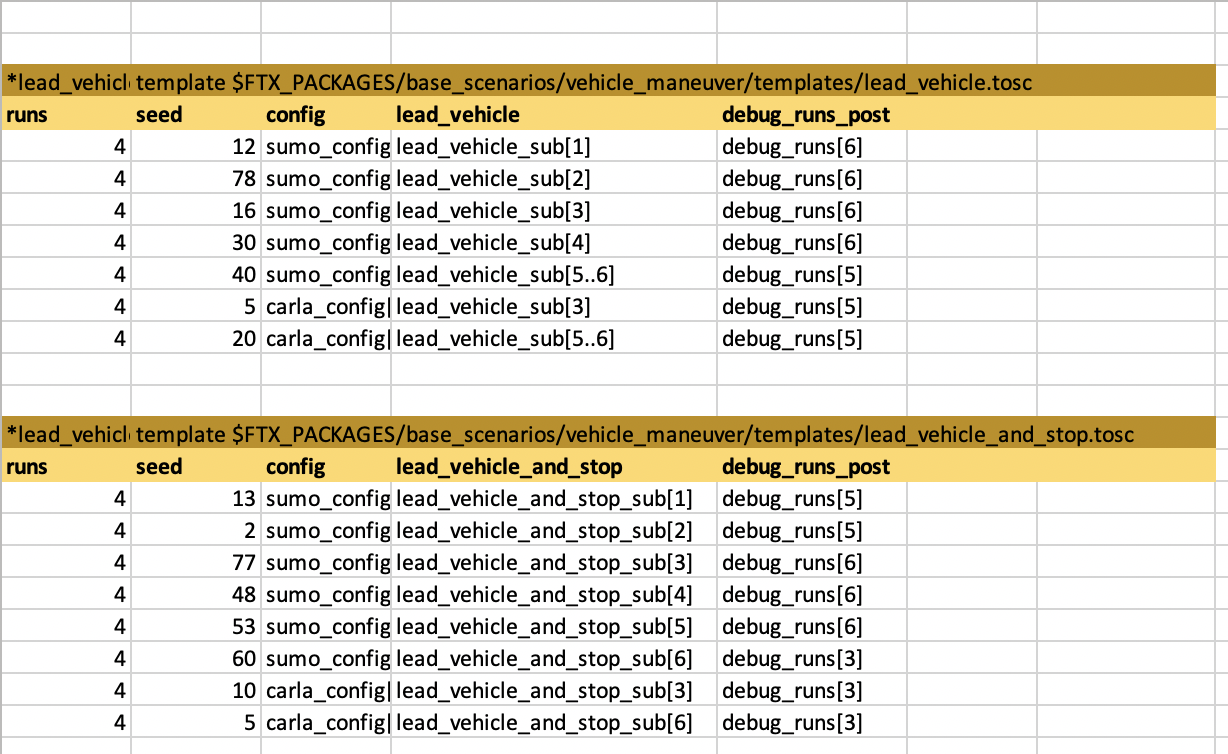
80.2.4 The CSV file for lead_vehicle sub
This CSV file defines two run groups, lead_vehicle_sub and lead_vehicle_and_stop_sub. Each run group has a different sub template, lead_vehicle_sub.tosc and lead_vehicle_and_stop_sub.tosc.
This CSV file shows how you can include multiple related scenarios into a single test suite.
80.2.5 The CSV file for config sub
This CSV file creates a single run group, sumo_config, and points to a single sub template, manually_driven_kinematic_no_ADAS_config.tosc in the $FTX_PACKAGES directory.
80.2.6 The main CSV file
This CSV file defines two run groups, lead_vehicle and lead_vehicle_and_stop. Each run group has a different sub template, lead_vehicle.tosc and lead_vehicle_and_stop.tosc.
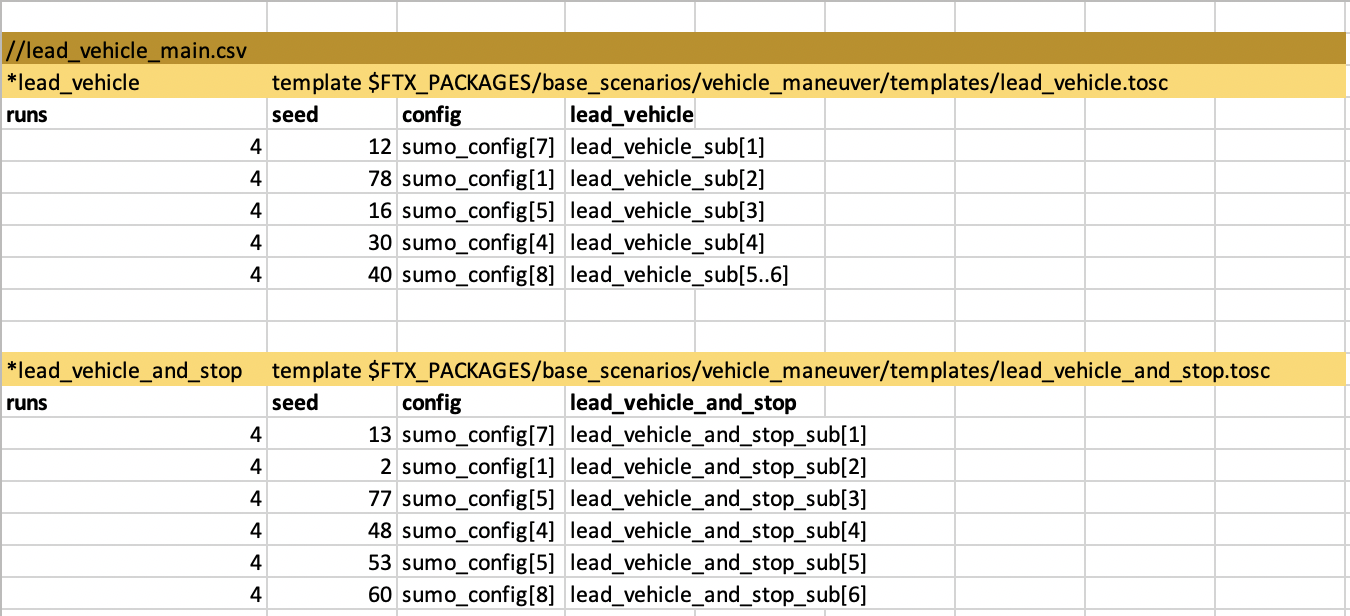
The values in the config column specify a specific line or range of lines in the sumo_config run group defined in the CSV file for the config sub. This column specifies the values that are used for the config parameter declared in the main template.
The values in the lead_vehicle or lead_vehicle_and_stop column specify a specific line or range of lines in the lead_vehicle_sub and lead_vehicle_and_stop_sub run groups defined in lead_vehicle.csv. This column specifies the values that are to be used for the lead_vehicle or lead_vehicle_and_stop parameter defined in the main template. (The main template for the lead_vehicle_and_stop() scenario is not shown in this document.)
The values for a sub template can specify a single line, a range of lines, or no range:
- If a single line is specified, all runs with that test use the same configuration.
- If a range of lines is specified, all runs with that test use one of the configurations included in that range.
- If the run group is specified without a range (not shown here), the tests run with a randomly selected configuration.
80.2.7 The command to create the tests
The --create option of FRun creates the tests, but does not execute them:
frun --create --csv lead_vehicle_main.csv --csv lead_vehicle.csv --csv sumo_config.csv --work_dir .
80.2.8 A sample test generated by FRun
Here is the test generated for line 5 of the CSV file for main. Note that in CSV files, blank lines and lines with comments are included in the line numbering, so line 5 refers to sumo_config[7] and lead_vehicle_sub[1]. In turn, sumo_config[7] refers to the parameters defined in line 7 within the sumo_config run group and lead_vehicle_sub[1] refers to the parameters defined in line 1 of the lead_vehicle_sub run group.
import "$FTX/config/sim/sumo_default.osc" # From: 'sim: sumo' from manually_driven_kinematic_no_ADAS_config.tosc
import "$FTX_PACKAGES/base_scenarios/scenarios/lead_vehicle/lead_vehicle/lead_vehicle_top.osc"


### Start subtemplate config
### Imported from manually_driven_kinematic_no_ADAS_config.tosc


extend test_config:
    set map="$FTX_PACKAGES/maps/cloverleaf.xodr" # From: 'map: cloverleaf' from manually_driven_kinematic_no_ADAS_config.tosc

### End subtemplate config


### Start subtemplate lead_vehicle
### Imported from lead_vehicle_sub.tosc


extend sut.lead_vehicle:
    pass
    keep(speed in [50..100]kph) # From: 'speed: [50..100]kph' from lead_vehicle_sub.tosc
    keep(lead_vehicle.color == blue) # From: 'color: blue' from lead_vehicle_sub.tosc
    keep(lead_vehicle.category == sedan) # From: 'category: sedan' from lead_vehicle_sub.tosc
### End subtemplate lead_vehicle


extend top.main:
    do a: sut.lead_vehicle()
80.3 Example: the post plugin
When you use the sub plugin you have to modify the main template in order to specify the sub table as a parameter and to create a placeholder where you want the sub template expanded.
The post plugin lets you expand the main template without editing it. Instead the post template is automatically expanded at the end of the main template.
80.3.1 The post template
The syntax of a post template is the same as that of a sub template, consisting of a template header, followed by OSC2 code with embedded parameters. Here is an example post template that enables some debug features:
$$sub(enable_debug):
    details: $$param("true")
    video: $$param("true")

$$expand():
extend test_config:
    set detailed_object_reporting = $$(details))
    set enable_record_video = $$(video)
80.3.2 Post run table
The syntax for post tables is similar to the syntax for sub tables. In the first row, the value of the first column is the name of the run group, and the filename in the second column with the label post identifies the post template.

80.3.3 Main table
In the main table, add a column whose heading is the name of a run group in the post table. If a main table contains more than one column referencing a post table, the corresponding post templates are expanded in the main template in the order that they appear in the main table.
80.3.4 The command to create the tests that include the post table
The --create option of FRun creates the tests, but does not execute them:
frun --create --csv lead_vehicle_main_debug.csv --csv lead_vehicle.csv --csv sumo_config.csv --csv debug_runs.csv --work_dir .
80.4 Example: basic plugin
The basic plugin is used to run specific tests a specific number of times. This plugin is useful if you have a set of tests that you want to run on a regular basis.
The basic plugin does not generate multiple tests from a test template or support applying constraints defined in the run table to test parameters. Instead, values for test parameters are selected based on the constraints specified in the test.
The basic run table has only two parameters in addition to runs and seed:
- test is the test file name
- directory is the pathname of the directory containing the test file
Here is an example spreadsheet containing two run tables, both activating the basic plugin:
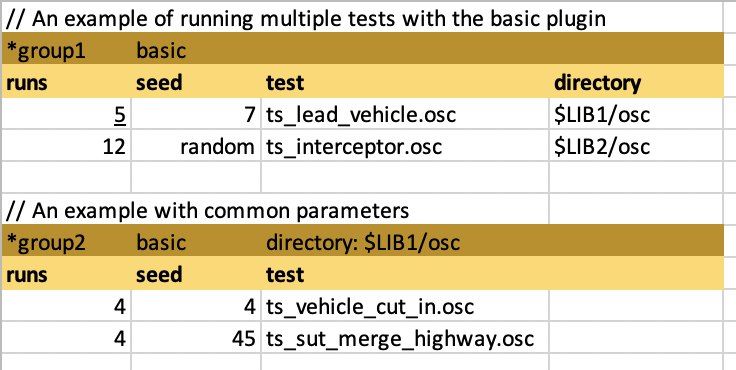
This example results in the following:
-
The first run table is called group1.
- It uses the basic plugin.
- It has two activation lines, so the plugin is invoked twice, for a total of 17 runs.
-
The second run table is called group2.
- It also uses the basic plugin, but it specifies a common value for the directory parameter ($LIB1/osc).
- It has two activation lines, so the plugin is invoked twice, for a total of 8 runs.
80.5 Creating the tests
With the --create option, FRun creates the tests and then exits before filtering the tests or executing them. This option is useful when you want to inspect the test files before executing the runs or when you use some other infrastructure to execute the runs.
$ frun --csv lead_vehicle.csv --create --work_dir ./work
With the create switch, FRun also creates:
- A test_list.csv file that lists each test created on a separate line with the parameters specified.
- A run_requests.json file but does not pass it to the dispatcher to execute the runs.
./work/
    20220118_223238_14955/
        foretify_runs/
        frun.log
        run_requests.json
        test_list.csv
        tests/
            lead_vehicle_5_1.osc
            lead_vehicle_6_1.osc
            ...
Note
- The foretify_runs directory is empty.
- At the end of the frun.log, you will find instructions for running all tests in either batch or interactively, as well as instructions for running a single test interactively.
- By default, Frun does not generate duplicate tests. To remove this feature please run with --allow_duplicates.
80.6 Filtering the tests
With the --filter option, FRun creates the tests and filters them before executing the runs. In the filter phase, the parameter values to be used in each test are generated and the execution of each test is planned. It’s possible that some tests cannot be generated or cannot be planned because the constraints are too tight. With this option, you can identify the failing tests and correct them.
$ frun –csv lead_vehicle.csv --filter --work_dir ./work
- The foretify_runs/filter directory with a sub-directory for each test.
- A filtered_test_.csv file. This file is the same as the test_list.csv file except that the second column indicates whether the test passed the filter stage successfully or not.
./work/
    <timestamp>/
        foretify_runs/
            filter/
                lead_vehicle_5_1/
                    builds/
                    logs/
                    runs/
                ...
       filtered_test_list.csv
       frun.log
       run_requests.json
       test_list.csv
       tests/
           lead_vehicle_5_1.osc
           lead_vehicle_6_1.osc
           ...
80.7 Executing the tests
Batch mode executes many runs (a test suite or regression) for later analysis via Foretify or Foretify Manager.
$ frun –csv lead_vehicle.csv --batch --work_dir ./work
With the batch option, FRun creates and filters the tests, and then passes the JSON file to the dispatcher to execute the requests. A batch directory is added to foretify_runs with a sub-directory for each run group. Within that sub-directory is a runs directory with a sub-directory for each run with the name <timestamp>. The <timestamp> directory contains coverage and run data. The collect_runs.sh script uploads the test suite to Foretify Manager.
Note
The batch option filters the tests by default. If you are rerunning a test suite, and you are confident that all tests compile without errors, you can skip the filtering stage to save time using the --skip_filter option as follows:
$ frun –csv lead_vehicle.csv --skip_filter --batch --work_dir ./work
./work/
    <timestamp>/
        collect_runs.sh
        filtered_test_list.csv
        foretify_runs/
            filter/
                lead_vehicle_5_1/
                    builds/
                    logs/
                    runs/
                ...
             batch/
                 lead_vehicle_5_lead_vehicle_5_1/
                     builds/
                     logs/
                     runs/
                         <timestamp>\
                         ...
                 ...
        frun.log
        run_requests.json
        test_list.csv
        tests/
            lead_vehicle_5_1.osc
            lead_vehicle_6_1.osc
            ...
For information on uploading the test suite results to Foretify Manager, see Upload a regression.