Using OSC2
OSC2 is a domain-specific language designed for describing scenarios where actors such as cars and pedestrians move through an environment. These scenarios have parameters that let you control and constrain the actors, their movements and the environment.
OSC2 is designed to facilitate the composition of scenarios and tests, making it possible to define complex behaviors using your own methodology. A minimal, extensible set of actors and actions comprise the fundamental building blocks. Some built-in scenarios perform tasks common to all scenarios, such as implementing parallel execution. Others describe relatively complex behavior, such as the vehicle.traverse_junction() scenario. By calling these scenarios, you can describe even more complex behavior, such as a vehicle approaching a yield sign. For further complexity, multiple scenarios can be mixed, or executed in parallel. For example, a weather scenario can be mixed with a vehicle scenario.
It is easy to create new actors and new scenarios as the need arises, either from scratch, using what you have defined so far, or using the actors and scenarios defined in the Foretellix V-Suites libraries.
OSC2 building blocks
The building blocks of OSC2 are data structures:
-
Structs are basic entities containing attributes, constraints and so on.
-
Actors represent real world entities. They are like structs, but also have associated behaviors.
-
Actions describe the basic building blocks of an actor's behavior, such as vehicle.drive() or person.move().
-
Scenarios describe more complex behavior of actors based on the actor's actions. For example, the vehicle.cut_in() scenario described below makes use of the vehicle.drive() action.
-
Modifiers change the behavior of scenarios for the purpose of a particular test.
Note
Modifiers share a similar structure with scenarios and actions, but are not considered a proper structured type.
These structures have attributes that hold scalar values, lists, and other structures. Attribute values can be described as expressions or calculated by external method definitions. You can control attribute values with keep() constraints, for example:
scenario traffic.scenario1:
    my_speed: speed

    keep(my_speed < 50kph)
See complete example.
You can control attribute values in scenarios either with keep() constraints or with scenario modifiers such as speed().
    do parallel(overlap:equal):
        car1.drive()
        car2.drive() with:
            speed(speed: 20kph, faster_than: car1)
See complete example.
Structures also define events, for example:
event deep_snow is (snow_depth > 15cm)
See complete example.
You can describe scenario behavior by calling the built-in actions such as vehicle.drive(). You can call the composition operators serial() or parallel() to implement your scenario in a serial or parallel execution mode or to mix it with another scenario. Other built-in actions implement time-related behaviors, such as emit event, wait, or error reporting.
Example scenarios
Now let’s look at some examples.
Define an actor
Example 1 shows how to define and extend an actor. The actor my_car_group is initially defined with two attributes.
# Define an actor
actor my_car_group:
    average_distance: length
    number_of_cars: uint
See complete example.
Then it is extended in a different file to add another attribute.
# Extend an actor in a separate file
import "my_car_group.osc"

extend my_car_group:
    average_speed: speed
See complete example.
Define scenario phases
Example 2 shows how to define a new scenario called two_phases(). It defines a single actor, truck1, which is a green truck. It uses the serial operator to activate the truck1.drive() scenario, and it applies the speed() modifier.
two_phases works as follows:
-
During the first phase, truck1 accelerates from 0 kph to 10 kph.
-
During the second phase, truck1 keeps a speed of 10 to 15 kph.
Note
two_phases() is very concrete because the value for each parameter is defined explicitly. We’ll see how to define more abstract scenarios later.
# A two-phase scenario
scenario traffic.two_phases:   # Scenario name
    # Define the truck with specific attributes
    truck1: vehicle with:
        keep(it.color == green)
        keep(it.vehicle_category == box_truck)

    # Define the behavior
    do serial:
        phase1: truck1.drive() with:
            speed(speed: 0kph, at: start)
            speed(speed: 10kph, at: end)
        phase2: truck1.drive() with:
            speed(speed: [10..15]kph)
See complete example.
Define a test
Example 3 shows how to define the test to be run:
-
Import the proper simulator configuration. In this case we want to run this test with the SUMO simulator.
-
Import the two_phases() scenario we defined before.
-
Extend the test configuration struct to select the map for the test.
-
Extend the predefined, initially empty top.main() scenario to invoke the imported two_phases() scenario.
import "$FTX_BASIC/exe_platforms/sumo_ssp/config/sumo_config.osc"
import "two_phases.osc"

extend test_config:
    set map = "$FTX_PACKAGES/maps/hooder.xodr" # specify map to use in this test

extend top.main:
    do traffic.two_phases()
See complete example.
The cut_in() scenario
Example 4 shows how to define the cut in() scenario. In this scenario, car1 cuts in front of the sut.car, either from the left or from the right. sut.car, sometimes called the Ego, is a predefined actor that can be linked to an ADAS or AV System Under Test (SUT).
Note
This scenario is more abstract than two_phases(). We’ll see later how we can make it more concrete if needed.
This scenario has three parameters:
- The car doing the cut in (car1).
- The side of the cut in (left or right).
- The path (road) used by the two cars, constrained to have at least two lanes.
Then we define the behavior:
-
In the first phase, get_ahead, car1 gets ahead of the sut.car. This phase ends within 1 to 5 seconds, as defined by the duration() parameter, when car1 gets ahead of sut.car by 5 to 15 meters, as defined by the second position() modifier.
-
In the second phase, change_lane, car1 cuts in front of the sut.car. This phase starts when get_ahead finishes and ends within 2 to 5 seconds when car1 is in the same lane as sut.car.
Note that both the serial() and parallel() operators are used in this scenario. The two phases are run in sequence, but within each phase, the movement of car1 and sut.car are run in parallel.
The scenario modifiers speed(), position() and lane() are used here. Each can be specified either in absolute terms or in relationship to another car in the same phase. Each can be specified for the whole phase, or just for the start or end points of the phase.
# The cut-in scenario

scenario sut.cut_in:
    car1: vehicle        # The other car
    side: av_side    # A side: left or right

    r: one_way_road with: keep(it.min_lanes >= 2)# at least two lanes

    do serial():
        get_ahead: parallel(duration:[1..5]s, overlap:equal): # get_ahead is a label
            sut.car.drive() with:
                speed(speed: [30..70]kph)
                along(r)
            car1.drive() with:
                position(distance: [5..100]m,
                    behind: sut.car, at: start)
                position(distance: [5..15]m,
                    ahead_of: sut.car, at: end)
                along(r)
        change_lane: parallel(duration:[2..5]s, overlap:equal): # change_lane is a label
            sut.car.drive() with:
                along(r)
            car1.drive() with:
                lane(side_of: sut.car, side: side, at: start)
                lane(same_as: sut.car, at: end)
                along(r)
See complete example.
The two_cut_in() scenario
Example 5 shows how to define the two_cut_in() scenario using the cut_in() scenario. It executes a cut in from the left followed by a cut in from the right. Furthermore, the colors of the two cars involved are constrained to be different.
scenario sut.two_cut_ins:
    do serial():
        c1: cut_in(side: left)        # c1 is a label
        c2: cut_in(side: right)       # c2 is a label
    with:
        keep(c1.car1.color != c2.car1.color)
See complete example.
The cut_in() scenario with concrete values
Example 6 shows how to run cut_in() with concrete values. The original cut_in() specified ranges, so by default, each run would choose a random value within that range. However, you can make the test as concrete as you want using constraints.
# Run cut_in with concrete values
extend top.main:
    do sut.cut_in() with:
        keep(it.get_ahead.duration == 3s)
        keep(it.change_lane.duration == 4s)
See complete example.
Mix multiple scenarios
Example 7 shows how to mix multiple scenarios: the cut_in() scenario, another scenario called interceptor_at_yield(), and a weather() scenario. The mix_dangers() scenario has a single attribute of type weather_type, which is constrained to be not clear, because we want a dangerous situation. This attribute is passed to weather.
scenario sut.mix_dangers:
    weather: weather_type
    keep(weather != clear)

    do parallel(overlap:any):
        cut_in()
        interceptor_at_yield()
        environment.weather(kind: weather)
See complete example.
A case study: the cut_in_and_slow() scenario
Writing a scenario is an iterative process that goes through a number of steps:
-
Describe the scenario in text, including the verification goals, the key performance criteria and the important aspects of the test you want to exercise.
-
Divide the scenario in phases and illustrate them with graphics.
-
Define the metrics that you must capture to determine whether the scenario was thoroughly exercised and whether the SUT performed as expected.
-
Implement the scenario using OSC2.
This section illustrates these steps using a case study.
Describe the scenario in text
The cut_in_and_slow() scenario is a classic one that happens frequently in traffic. As its name suggests, a vehicle cuts in front of the SUT and then slows down.
The first step is to clearly state the SUT behavior to verify (the verification goal). For this scenario the verification goal is:
The cut_in_and_slow() scenario must verify that the SUT takes defensive measures to prevent a collision with a vehicle that cuts in front of it and slows down.
The verification goal does not specify anything about how to verify, but only what to verify. This distinction is very important. If the what is clear, the how is simple to define and implement. The verification goal is made measurable in a later step by adding coverage and performance metrics.
The next step is to define the behavior of other actors in the scenario. Typically the behavior of the other actors is intended to challenge the SUT to respond to a new situation in a safe manner.
- The cut_in_vehicle comes from behind the SUT in a different lane and passes by the SUT.
- The cut_in_vehicle pulls into the SUT’s lane.
- The cut_in_vehicle slows down.
Next, we define the criteria that verify the desired behavior:
- At the end of the scenario, the SUT's speed is not greater than the speed of the cut_in_vehicle.
Describe the scenario phases graphically
The behavior of the cut_in_vehicle is described above as three steps, or phases. It is useful to represent these phases graphically in order to explore and understand the desired behavior and the metrics that define it.
Figure 1 shows a top-level depiction of the scenario from beginning to end.
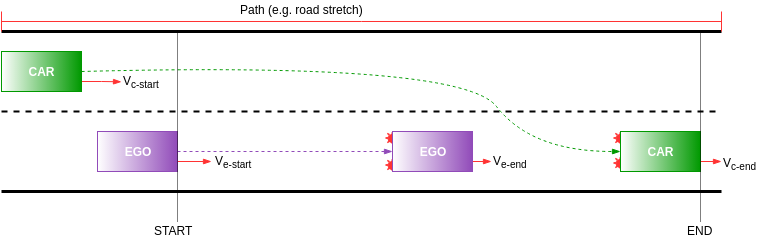
Figure 1 shows that the SUT and the other vehicle start in the specified positions: the other vehicle is behind the SUT, on one side or the other, with a speed that can be different than zero. At some point the other vehicle passes and cuts in front of the SUT. Once the vehicle is in the same lane as the SUT, it starts breaking until a given speed is reached.
Next, dividing the scenario into three separate phases helps to uncover some details and facilitates the implementation of the scenario. Figure 2, Figure 3 and Figure 4 show the three phases: start behind the SUT, change lane and slow.

The first phase is defined between the start position and the position where the other vehicle is ahead of the SUT. In this phase the vehicle accelerates to get ahead of the SUT (while also keeping its lane), while the SUT maintains its speed and trajectory.

In the second phase, the vehicle changes lanes to get in front of the SUT. The SUT still maintains its speed and trajectory as long as the cut-in is not aggressive, for example changing lanes at a sharp angle and/or at short distance. The speed of the vehicle at the end of this phase can be equal to or higher than the speed at the start of this phase.

In the third phase, the other vehicle brakes and the SUT must react in a safe manner. The final speed must be less than the initial speed of the cars entering this phase.
OSC2 facilitates the segmentation of a scenario into phases and provides a built-in chaining mechanism.
Define coverage metrics
Coverage metrics show how thoroughly the scenario has been exercised.
As an example, some interesting parameters to cover at the start and end of the cut-in phase are:
- The distance between the SUT and the cut_in_vehicle measured in meters or centimeters.
- The absolute speed of the SUT measured in km/h.
- The relative speed of the cut_in_vehicle in m/s.
Figure 5 describes these parameters graphically:
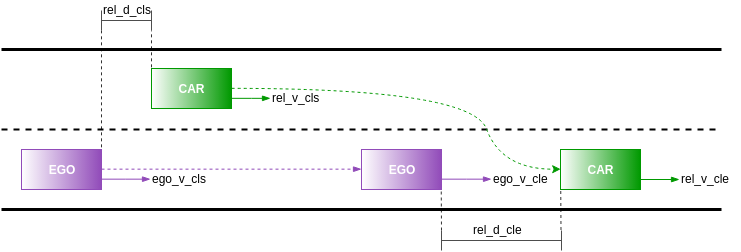
The notations mean:
- rel_d_cls: relative distance at change lane start point
- ego_v_cls: absolute speed of the SUT at change lane start point
- rel_v_cls: relative speed of the other vehicle to the SUT at change lane start point
- rel_d_cle: relative distance at change lane end point
- ego_v_cle: absolute speed of the SUT at change lane end point
- rel_v_cle: relative speed of the other vehicle to the SUT at change lane end point
For each of these parameters the values of interest are described in the table below:
| Parameter | Unit | Ranges |
|---|---|---|
| rel_d_cls | cm | Equal intervals of 50cm in [0..1500]cm |
| dut_v_cls | km/h | Equal intervals of 10km/h in [10..130]km/h |
| rel_v_cls | km/h | Equal intervals of 1m/s in [-33..33] m/s |
| rel_d_cle | cm | Equal intervals of 50cm in [0..3000]cm |
| dut_v_cle | km/h | Equal intervals of 10km/h in [10..130]km/h |
| rel_v_cle | km/h | Equal intervals of 1m/s in [-33..33] m/s |
For more details, see Defining coverage metrics.
Implement the scenario in OSC2
First is the scenario declaration.
# declare cut_in_and_slow
scenario sut.cut_in_and_slow:
    car1: vehicle  # The "cut-in" car
    side: av_side  # The side of which car1 cuts in, left or right
See complete example.
The scenario name is cut_in_and_slow and it is defined inside the namespace of the SUT actor. The scenario is a container for road paths, various parameters and, of course, the scenario behavior—a sequence of actions.
In OSC2, all fields are randomizable by default, unless specified otherwise by prepending var to field's name. This means that fields are given random values at run time within their legal value space. Every field has a physical value space defined by the range of values for its type and a legal value space, which is the intersection between physical value space and any constraints applied to it. For example, the side field has the physical value space of [left, right] and an identical legal value space, unless constraints are applied to it.
OSC2 provides a number of actors—components that contain and execute activities. The sut actor represents the SUT (System Under Test), the vehicle actor represents other vehicles (NPCs). Other actors are also provided by OSC2: weather, pedestrian etc. You can define your own actors if necessary. All scenarios must be defined and executed in the context of an actor.
Next is the definition of the scenario behavior, considering the three phases already introduced in the previous section.
This example shows how to place the implementation of a scenario in a separate file using extend. Having separate files makes it easy to switch between multiple implementations of the same scenario.
# cut_in_and_slow_imp
extend sut.cut_in_and_slow:
    do serial():
        start_behind_sut: parallel(duration:[1..5]second, overlap:equal):
            sut.car.drive()
            car1.drive() with:
                speed(speed: [30..200]kph)
                position(distance: [5..100]meter, behind: sut.car, at: start)

        change_lane: parallel(duration:[1.5..3]second, overlap:equal):
            sut.car.drive()
            car1.drive() with:
                l1: lane(side_of: sut.car, side: side, at: start)
                p1: position(time: [0.5..1]second, ahead_of: sut.car, at: start)
                speed([30..200]kph, run_mode: best_effort)
                avoid_collisions(false)
                l2: lane(same_as: sut.car, track: projected, at: end)
                p2: position(time: [1.5..2]second, ahead_of: sut.car,
                        track: projected, at: end)

        slow: parallel(duration:[3..5]second, overlap:equal):
            sut.car.drive()
            car1.drive() with:
                keep_lane()
                acceleration(acceleration:  \
                [car1.policy.get_min_acceleration()..car1.policy.get_min_acceleration()/2])
See complete example.
The serial() built-in operator describes sequential activities that are chained in the order they are defined. In this case the start_behind_sut is executed first, followed by change_lane, followed by slow.
The parallel() built-in operator describes parallel activities. For example the sut.car.drive() and car1.drive() are executed in parallel. Each parallel() has a start and an end point in time. Similarly, the serial() starts at the beginning of the first phase and finishes at the end of the last phase. For more information on these operators, see serial and parallel.
But on which side of the SUT does car1 start at the start of start_behind_sut phase? Foretify plans the trajectory of car1 such that it is on the side of the SUT at the start of change_lane phase. In other words Foretify infers all necessary movements in order to get to the desired position at the start of change_lane. This facilitates scenario writing and creates more diverse concrete scenarios.
Make the scenario easily reusable
Scenarios are composable: you can reuse an already defined scenario in a new scenario. In this example, it makes sense to create a separate scenario out of the change_lane phase and reuse it in the cut_in_and_slow() scenario.
Here is the cut_in scenario in its own file (cut_in.osc):
# cut_in.osc
scenario sut.cut_in:
    car1: vehicle  # The "cut-in" car
    side: av_side  # The side of which car1 cuts in, left or right

    do serial():
        change_lane: parallel(duration:[1.5..3]second, overlap:equal):
            sut.car.drive() with:
                keep_lane()  # prevent sut from avoiding cut in
            car1.drive() with:
                l1: lane(side_of: sut.car, side: side, at: start)
                p1: position(time: [0.5..1]second, ahead_of: sut.car, at: start)
                speed([30..200]kph, run_mode: best_effort)
                avoid_collisions(false)
                l2: lane(same_as: sut.car, track: projected, at: end)
                p2: position(time: [1.5..2]second, ahead_of: sut.car,
                    track: projected, at: end)
See complete example.
Now the cut_in_and_slow() scenario needs to import and invoke cut_in() scenario.
# cut_in_and_slow_imp.osc
import "cut_in.osc"

# cut_in_and_slow
scenario sut.cut_in_and_slow:
    car1: vehicle  # The "cut-in" car
    side: av_side  # The side of which car1 cuts in, left or right

extend sut.cut_in_and_slow:
    do serial():
        start_behind_dut: parallel(duration:[1..5]second, overlap:equal):
            sut.car.drive()
            car1.drive() with:
                speed(speed: [30..200]kph)
                position(distance: [5..100]meter, behind: sut.car, at: start)

        cut_in: cut_in(car1: car1, side: side)

        slow: parallel(duration:[3..5]second, overlap:equal):
            sut.car.drive()
            car1.drive() with:
                keep_lane()
                acceleration(acceleration:
                [car1.policy.get_min_acceleration()..car1.policy.get_min_acceleration()/2])
See complete example.
The line that invokes the cut_in scenario passes the car1 actor and side parameters from cut_in_and_slow to cut_in, allowing top-down control of parameters.
Composability is important because it lets you create complex scenarios out of smaller, simpler ones. The reuse of scenarios reduces the maintenance and scenario development effort, implicitly reducing the time to market.
Add coverage metrics
Coverage definitions can be defined inside a scenario, either in the scenario definition or in an extension (also known as aspect) of the scenario. This example implements it as a scenario extension in a separate file (cut_in_cover.osc).
# cut_in_cover
extend sut.cut_in:
    cover(side)
    # sample the same parameters at the start of change_lane phase
    var rel_d_change_lane_start:= sample(map.abs_distance_between_positions(
        sut.car.state.msp_pos.road_position,
        car1.state.msp_pos.road_position), @start) with:
        cover(rel_d_change_lane_start,
            text: "How ahead is car1 relative to dut at change_lane start (in centimeter)",
            unit: centimeter,
            range: [0..5000],
            every: 50)

    var dut_v_change_lane_start:= sample(sut.car.state.speed, @start) with:
        cover(dut_v_change_lane_start,
            text: "Speed of dut at change_lane start (in kph)",
            unit: kph,
            range: [10..200],
            every: 10)

    var rel_v_change_lane_start := sample(car1.state.speed - sut.car.state.speed,
     @start) with:
        cover(rel_v_change_lane_start,
            text: "How much faster is car1 than the sut at change_lane start (in m/sec)",
            unit: mps,
            range: [-53..53])

    # sample the same parameters at the end of change_lane phase
    var rel_d_change_lane_end:= sample(map.abs_distance_between_positions(
        sut.car.state.msp_pos.road_position,
        car1.state.msp_pos.road_position), @change_lane.end) with:
        cover(rel_d_change_lane_end,
            text: "How far ahead is car1 from dut at change_lane end (in cm)",
            unit: centimeter,
            range: [0..6000],
            every: 50)

    var dut_v_change_lane_end:= sample(sut.car.state.speed, @change_lane.end) with:
        cover(dut_v_change_lane_end,
            text: "Speed of dut at change_lane end (in kph)",
            unit: kph,
            range: [10..200],
            every: 10)

    var rel_v_change_lane_end := sample(car1.state.speed - sut.car.state.speed,
        @change_lane.end) with:
        cover(rel_v_change_lane_end,
            text: "How much is car1 than the sut at change_lane end (in m/sec)",
            unit: mps,
            range: [-53..53])
See complete example.
When defining coverage metrics, it is important to take into consideration two dimensions: what parameter values to sample and when to sample them.
Coverage definitions use events that specify the moment in time to sample a parameter. In this example change_lane.start and change_lane.end are the sampling events that activate the parameter sampling. You can use predefined events or define and trigger custom events that reuse the predefined ones.
To see how to use sample, see the sample-exp parameter in the Fields and variables section.